Sunday, August 28, 2011

Sunday Stampers - Birds, Plus a Quick Tutorial!


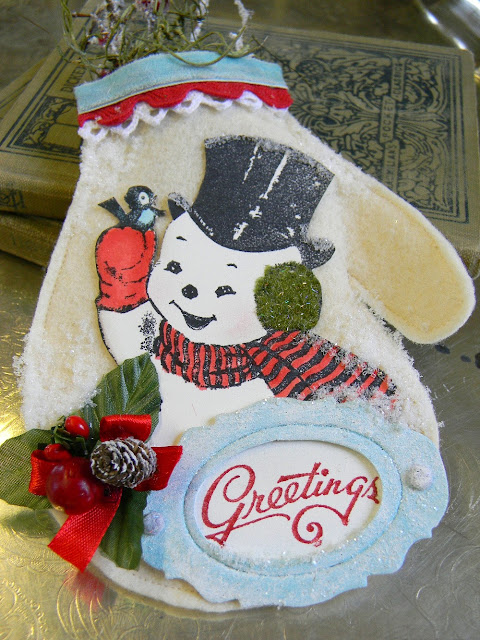
Today's Sunday Stampers theme is birds - I might be stretching it just a bit to include this, but there IS a bird on it! I got the idea for the mitten from one I saw on Pinterest that was done by Betsy Veldman. I loved this idea so much and thought the Frosty stamp from Artistic Outpost's Frosty and Friends collection would be perfect for it.

The mitten pattern came from MME Designs (thank you!). I traced it onto cream felt, cut two pieces and stitched them together.

Next, I stamped Frosty onto watercolor paper and colored him using Broken China and Barn Door and Distress ink and a water brush. I cut it out and inked the edges with Frayed Burlap Distress ink. He's adhered to the mitten with Elmer's Craft Glue.

The frame was cut from chipboard using Tim's Tag and Bookplates die. I used an Aqua Paint Dabber to paint it and then went over it with a Snow Cap Dabber to give it a frosty feel. When the paint dried, I covered the frame with a thick layer of Rock Candy Stickles. I also added bits of chunky glitter here and there.

You might notice his fluffy looking ear muff - it's Sparkly Fluff! I love the extra sparkle and dimension it gives the piece. Below you'll find a tutorial on how to tint white Fluff using Distress Stain. Now, you can match it to  any project!

Supplies: Ranger Distress Stain in desired color(s), Sparkly Fluff - Sugar (white), craft stick, plastic palette or something similar (I like to reuse lids from plastic containers - they are perfect for corralling the fluff!).

Step 1: Begin by dispensing a small amount of stain onto your palette. You can mix several colors, if desired.

Step 2: Sprinkle a small amount of Sparkly Fluff over the stain.

Step 3: Using your craft stick, begin working the Sparkly Fluff into the Distress Stain. At this point you can add more stain and/or Fluff if needed. Your Fluff will look quite clumpy at this point. Just keep moving the Fluff around until it is completely colored, but not overly saturated. If you have too much Stain, add more Fluff.

Step 4: Let the Sparkly Fluff dry completely. I found the dashboard of a car sitting in the sun worked very well...just make sure you warn your husband so he doesn't freak out and throw that 'moldy stuff' away. ;-) When your Fluff is dry, break up the clumps by rubbing them with your fingers. You will be so surprised at how it 're-fluffs'! After you use it in your project, you can store the excess in a small baggie.

Thanks so much for stopping by - have a great week!


Tuesday, August 23, 2011

Simon Says Stamp & Show Some Travel

For this week's SSS theme - Show Some Travel, I created a little Parisian shadowbox using rubber stamps from Artistic Outpost's Paris Exposition and Birds of a Feather collections. I also created a step by step tutorial that you can find on the AO blog.

This stamp of the two girls is one of my favorites! They were stamped onto watercolor paper and then colored using a water brush and Tumbled Glass Distress ink. The little banner behind them was created using the Sizzix Pennant die.

Of course, I had to find a way to incorporate a Faux Crazed Porcelain tag! If you haven't tried this technique, you can find the tutorial here. My tag is attached to the ribbon using an Idea-ology Charm Clip and Jump Ring.

The shadowbox was created using an old paper jewelry box. I covered it with Idea-ology Tissue Tape and then painted it with Picket Fence Distress Crackle paint and Pool and Aqua Adirondack Dabbers. The whole thing is sealed with Claudine Hellmuth Studio Matte Medium.

Don't forget, you still have time to enter the Inspiration Emporium monthly challenge! This month we are challenging you to use any kind of paint in your creations. One lucky winner will receive $50 Emporium Dollars to spend in the store. Remember too, you can use my code: stamptramp, to receive 10% off your purchase!

Thursday, August 18, 2011

A Dreamy Graduation Card

This past Sunday my daughter graduated from The University of Memphis with a degree in Film/Communications. She is planning to move to Los Angeles to pursue a career in film. Of course, just thinking about her leaving rips my heart in two, but I am thrilled that she's brave enough to truly follow her dreams!

I didn't want to make her a traditional card - we aren't very traditional people! - and I thought that 'Dream' was the perfect, simple sentiment to mark the occasion. The stamp is from Tim Holtz's Stuff to Say stamp collection. The frame insert was created using my Faux Crazed Porcelain technique. BTW, did you know that the centers of the bookplates from the Tag and Bookplates die fit perfectly into the Idea-ology Ornate Plates frames? That Tim Holtz guy is pretty brilliant, huh?

The balloons from Artistic Outpost's Paris Exposition were perfect for a 'Sky's the Limit' feeling. They were stamped on watercolor paper using black Stazon. I colored them using a water brush and Worn Lipstick, Bundled Sage, and Tumbled Glass Distress inks. After I cut them out, I adhered them to the card using foam squares.

The background paper is from Basic Grey. On top of that, I layered a piece of vintage ledger paper that was adhered to white cardstock and embossed using Tim Holtz's Postal Texture Fade. After I embossed it, I cut it using the Sizzix Baroque die and sanded it lightly with my Idea-ology Sanding Grip (love that tool!). A thin border of Antique Linen Distress Stickles and some ribbon dyed with Worn Lipstick Distress Stain and I was done!

Don't forget, Inspiration Emporium is offering all my readers a 10% discount on all orders from their store! Just enter my coupon code: stamptramp, at checkout. Also, make sure you check out the latest challenge on the IE blog - play along and you could win a $50 in Emporium dollars!

Monday, August 15, 2011

Getting Halloween-y For Grungy Monday

Another Monday, another excuse to get out some Distress products and get Grungy! This week's GM challenge was to use Distress Stickles in our creations. I just happen to have a couple bottles of Spiced Marmalade Distress Stickles that I've been saving for Halloween projects - today seemed like the perfect time to use them!
  
If any of you are my Facebook friends, you might remember the awesome Bingo cards that I scored at an antique store in Missouri. I've been itching to use them and decided to create a little Halloween hanging using one as a base.

Since 'trick' and 'Bingo' have the same number of letters, I thought I would cut letters from Tim Holtz's Chip Block die, to use across the top. They were cut from Grungepaper, inked with Spiced Marmalade Distress ink, and then coated with Spiced Marmalade Distress Stickles.

Unfortunately, they are way smaller than the letters on the card, so I had to think of a clever way to still use them! I decided to mount them on squares of paper from Basic Grey's Out of Print collection. That worked for covering the Bingo letters, but they were so boring! Mounting them on chipboard bulked them up some, but they still needed a bit more. Ooooh....what about a couple coats of UTEE? And then pressing the letters into the still-hot enamel to make a little tile? Perfect!

I am Bauble-less, but I wanted to create a little bling to fit in with the Simon Says Stamp - Bling challenge. Pearl beads colored with Adirondack Alcohol inks (brilliant trick from Tammy Tutterow!) plus a couple black beads I had lying around, coupled with an Idea-ology Trinket Pin and Mini Tassel, and I had me some bling!


To dress up the bottom, I created a little banner with my Sizzix Pennant die, Dusty Concord Distress Core'dinations paper, black cardstock, and Idea-ology Alpha Parts. I used a Silver Adirondack Dabber to add a bit of texture to the letters. The banner is attached to the Bingo card using an Idea-ology Tiny Attacher.

I just love this little owl! He's a rubber stamp from the Halloween Treats collection by Artistic Outpost. I stamped him on watercolor paper and colored the moon and part of his body with markers. Underneath, I created a rosette using Tim Holtz's Paper Rosette die and Idea-ology Kraft Resist Paper. The paper was colored with Spiced Marmalade Distress Stain and coated generously with Spiced Marmalade Distress Stickles. Behind the rosette, I made a little ruffle out of black crepe paper.

I just love how this turned out - I can't wait for Fall! If anyone is interested, I can post a tutorial sometime for the little letter tiles. Let me know what you think!

Wednesday, August 10, 2011

A Paper Mache Cup for Theme Thursday


Today, I decided I was going to take a little blogging/art break and just clean up my studio. It's a total wreck - seriously, you would be shocked. So, I started to clean off my desk and came across a half-finished paper mache teacup that I made months ago, using this fantastic tutorial by Ann Wood. It was abandoned after I made it because I couldn't decide how to finish it. I said to myself, No! Do not get distracted!" Then, I was putting away my Dabbers and thought, oooh, how cool would that cup look if I painted it a turquoise-y blue....and added the rosettes (that had been sitting inside the cup for safe keeping)?

So, I gave in to temptation and cleaned my desk by making something! Sounds reasonable, right? I painted my teacup with Pool, Snow Cap, and Aqua Dabbers. I had made a little banner for a different piece I was working on for the Theme Thursday Paris challenge, but ended up not using it it. Of course, I don't throw anything away, so I thought I'd reuse it on my cup! 'Paris' is spelled out using Tim Holtz's Chip Block die. Again, I used my Dabbers to color them and added a few splotches of white using Picket Fence Crackle Paint. The banners were made using French text and the Sizzix Pennants die.


The rosette trim is both the downfall and the winning element. In person, it is so adorable, but it makes it hard to see the shape of the teacup in the photos. I still think it's the perfect touch! White crepe paper was used to line the interior.

If you've never been to Ann Wood's site, you really need to check it out. She is an absolutely amazing and original artist.

Great news!! Inspiration Emporium is now offering a 10% discount for my readers! Just enter my coupon code: stamptramp at checkout and you'll receive 10% off of your whole order. Let's get shopping! Below is a list of supplies I used for the project:

Paint: Adirondack Distress Crackle Paint - Picket Fence; Adirondack Dabbers - Pool, Aqua, and Snow Cap.
Dies: Sizzix Chip Block, Pennant
Trims: Idea-ology Lavish Trimmings

Tuesday, August 9, 2011

Grungy Monday #19

I had so much fun creating this little ornament/hanging for the Grungy Monday challenge. Our inspiration was this tag from Tim Holtz's 12 Tags of Christmas. I just received the Fancy Frames Texture Fade and was dying to use it. I had an idea that it would really well as a 'window' using the clear packaging, but after that, I was stumped!

After a bit of tinkering, I decided to emboss my packaging, cut out the frame, and then cover it with silver Adirondack Paint Dabber. It needed something more, so I brushed on some of Claudine's Matte Medium and glittered it up!

To create the background, I embossed a piece of white cardstock using the same folder - but this time I used one of the Reflections stamps. Ooooh, it looks so cool! After seeing Stephen's fantastic card a couple weeks ago, I immediately knew I had to have both the stamps and the folders. Thanks, for the inspiraton, Stephen! :-)

After I trimmed the frame, I spritzed it with some homemade glimmer mist (made using Tim Holtz's recipe). I wish the shimmer showed up - it is too pretty. Next, I added a sweet little banner and some fantastic rubber stamps from Artistic Outpost. I created a little 'frost' around the edge of the frame using an Adirondack Snow Cap Dabber. The two pieces were glued together using more Matte Medium. Once it was dry, I added a ribbon (dyed using Brushed Corduroy Distress Stain), and a sweet little Idea-ology Mini Tassel.

The pictures simply do not do this justice! I can imagine a whole sparkling tree covered in these at Christmas. I think I am going to be wearing this Texture Fade out, for sure!

By the way, don't forget the paint challenge over at Inspiration Emporium. We would love to see your work. While you're checking out the store, make sure you take a peek at the 'Coming Soon' section; IE is now carrying Artistic Outpost rubber stamps. You can get all your goodies in one fantastic place!

Below is a list of everything I used in my ornament - I hope you're inspired to try one as well.

Supply List:
Rubber Stamps: Artistic Outpost - Birds of Feather, Songbirds; Tim Holtz - Reflections
Ink: Distress Ink - Tumbled Glass, Brushed Corduroy; Archival Ink - Jet Black, Distress Reinker - Tumbled Glass
Texture Fade: Sizzix - Fancy & Floral Frames Set
Die: Sizzix - Pennants
Adhesives: Claudine Hellmuth Studio Matte Medium
Glitter: Crafty Sparkles Platinum
Paint: Adirondack Dabber - Snow Cap, Silver
Embellishments: Idea-ology Mini Tassels

Thursday, August 4, 2011

Grungy Monday, Simon Says Stamp, PLUS a New Tutorial!

For this week's Grungy Monday challenge, we are getting our inspiration from one of Tim Holtz's 12 Tags of Christmas, which can be found here. I decided to use stamps from Artistic Outpost's Apothecary collection (don't forget - you get 10% off your Artistic Outpost order when you use my coupon code: stamptramp) to create a tag, which I'm also submitting for the Simon Says Stamp and Show a tag challenge.

My tag is topped with a flower that was made using Tim Holtz's Tattered Florals die and several different materials - French book pages that were coated with Rock Candy Crackle Paint, burlap, and Idea-ology Kraft Glassine.

The tag background was created using the Cuttlebug Stamps technique (my creation!) from the Apr/May '09 issue of the Technique Junkie newsletter. By combining it with a crackle stamp from I Brake for Stamps, I ended up with the It Takes Two technique from the latest issue of the TJ newsletter!

I just had to find a way to include my new Faux Crazed Porcelain technique! This time I punched a circle from some light chipboard and made a little tag for the neck of the bottle. Speaking of which...below is the tutorial I promised! You can also check it out on the Inspiration Emporium blog.

Faux Crazed Porcelain


Supplies: Ranger Distress Crackle Paint - Picket Fence; Ranger Adirondack Paint Dabber - Pitch Black; Ranger Ultra Thick Embossing Enamel - Clear; Sizzix Mini Labels Die; Versamark Ink - Clear; Tim Holtz Rubber Stamps - Stuff to Say

1. Begin by cutting a label from chipboard or mat board using the Mini Labels die. Cover it with a thin, but even, coat of Picket Fence Crackle Paint. Allow to dry.

2. When completely dry, 'ink' up your word stamp using the Dabber. Test your coverage several times on paper to make sure you have an even application before stamping onto your crackled piece.

3. Once you are happy with the coverage, stamp onto your label and let dry.

4. Next, completely cover label with Versamark, or other clear embossing ink.


5. Coat label with UTEE and heat emboss. Repeat at least two times, or until you are happy with the look of it.

How gorgeous is that? (Please make sure you click on the images to enlarge them - you can really see the detail!) There are unlimited possibilities with this technique. Try coloring the edges with a black Dabber for a vintage look, like I did on my easel card. You can also try different shapes and different materials - check out the clock face on this card! I would love to see what you create!

One note about my tutorials - I am always thrilled to share my ideas as I come up with them. I love using my blog as a way to share what I love and highlight the companies whose products I use. However, I have come across more than a few bloggers who have used my ideas without giving me any credit for the original idea. In at least one case there is someone who is teaching one of my techniques - even went so far as copying my tag! - and did not give me any credit or ask for my permission.

As an artist, this is incredibly hurtful. It takes a lot of time to come up with an idea, photograph the steps, and create a post. To have someone basically 'steal' and/or take credit for what I've worked so hard to create makes me think twice about being so generous. Fortunately, that lasts about 10 seconds and I'm back to thinking of new stuff to show you all! However, I DO ask that you link back to me if you're using one of my techniques. Thanks so much for your understanding! :-)

Supply List:

Artistic Outpost Rubber Stamps - Apothecary
Inkssentials Manila Craft Tags
Sizzix Texture Fades - Collage
Idea-ology Kraft Glassine
Grungeboard
Idea-ology Corners
Idea-ology Kraft Resist Paper
Ranger Rock Candy Crackle Paint