Friday, June 27, 2014

New Pop it Ups Release - Spiral Circle Pull Card

Hi all! Today Karen Burniston shared the second half of her Pop it Ups Summer release. Two of my favorite dies from this collection have to be the Clock and Gears and the Spiral Circle Pull Card. When combined, these dies are absolutely jaw-dropping!

The clock face is one of the coolest dies I've ever seen. The die even cuts the numbers out! To give the clock a vintage look, I stamped the face of it with Tim Holtz's Crackle stamp, and added lots of Brushed Corduroy Distress ink to the edges.

Here is the card in its open position. Amazing, right?! It's hard to see in the pic, but there is an accessory die that cuts a spiral that you attach to the back of the card that unfurls when you open the card. You can attach anything to the spiral, making it look like it's floating or flying. So cool!

The gears were all cut from thin chipboard and given my Faux Tarnished Silver technique. I am totally in love with these gears! They are sized perfectly for cards and tags and I know I will be using them a lot.

I dove deep down into my stash to find the perfect paper for this card. It's from Graphic 45's Steampunk Debutante collection and I'm pretty sure it's probably collectable by now, but I couldn't resist using it! I also remembered I had one of the coordinating stamp sets, so I used the little butterfly stamp to add even more movement to the card.


Static pictures can only show so much. There's nothing like a quick little Vine video to really show off these motion cards. One of my favorite features of the Spiral Circle Pull Card die is the little tabs that keep the card closed. I used the ejection holes from the large gear as faux brads on them. I think it just adds to the industrial look of the card.

All the new dies will be available in mid-July. The other supplies I used can be found at Inspiration Emporium via the links below. Remember to use my coupon code - stamptramp - to save 10% on your order!


Thanks so much for stopping by today - have a wonderfully creative weekend!

Wednesday, June 25, 2014

Easy DIY 4th of July Tray with Craft Attitude!

I'm so excited to be a part of the Craft Attitude 4th of July blog hop! For any of my readers who aren't familiar with this product, it's a transparent printable film that can be applied to just about anything. All you need is an inkjet printer and a surface!

I had a few ideas for projects, but when I came across this clear plastic tray at the Dollar Tree, I thought it would be perfect to customize for a fun 4th of July party piece. Read on to see how to create one yourself.

Supplies: Craft Attitude Adhesive Sheets, 8-Sheet, 8.5 by 11-Inch (even though it says Wood Attitude, it can be used on any surface); Dollar Tree Clear Plastic Tray; Vintage Postcard Clipart - free from Vintage Holiday Crafts; Spray Adhesive; Scissors

Begin by printing the postcard image onto Craft Attitude film. Allow it to dry completely then trim closely and apply spray adhesive to the printed side of the film. Note: since we'll be applying the film to the back of a clear surface, the images do not have to be reversed.

Starting with the center section, adhere one edge of the film to the tray. Carefully peel off the backing and smooth the rest of the printed film into place. Repeat for the other two compartments.

To finish the corners, pinch the excess film at the corners and trim with sharp scissors. Smooth any wrinkles and your project is complete! Since it isn't completely water-safe, I would probably only use this for drier foods like chips and crackers. But it does easily wipe clean and can be reused. So fun!

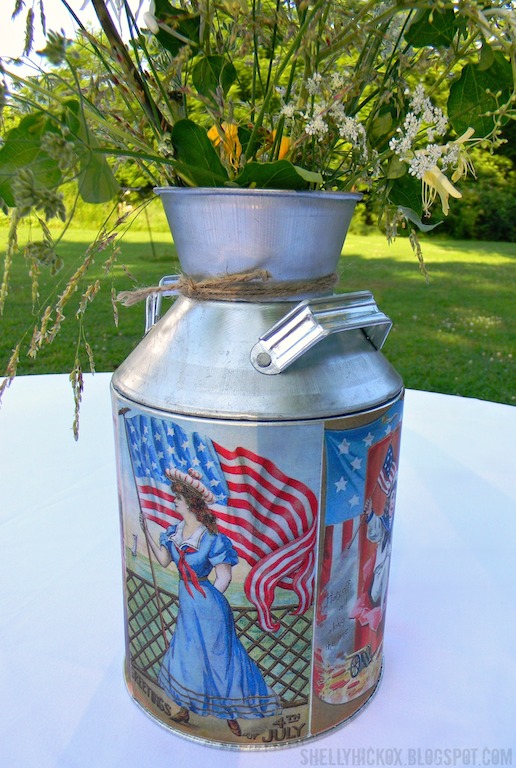
I was at Michaels picking up a can of spray adhesive for my tray project when I spotted this milk can. Even though I hadn't planned to do another project, I couldn't resist!

This project went together very quickly. I printed out several more vintage postcards, making sure to size them accordingly. Since these would be applied with the printed side to the can, the images needed to be reversed. After letting them dry, I trimmed them, misted with spray adhesive, and applied them to the can. It's hard to see in the photo, but the metallic sheen comes through the image, making it almost look like it's painted onto the can. Very cool!

Make sure you check out all the other fantastic projects from my fellow designers. I know you'll come away full of ideas for using this wonderful product!


An InLinkz Link-up

Disclosure: Craft Attitude provided the film I used for my projects and this post contains affiliate links.

Tuesday, June 24, 2014

Birthday Cake Artist Trading Blocks


Hi all! I have such a fun project to share with you today. It's an Artist Trading Block birthday cake! I've had this idea for awhile...my original thought was for it to be a wedding cake, but when I realized my daughter's birthday was next week I was like - perfect!

Here's how I put it together:

Cover six 12" x 6" pieces of medium weight chipboard with paper (I use Elmer's Spray Adhesive and I love it!). Cut two box pieces using Eileen Hull's 3D Block die, cut four more using her 3D Cubes die. Cut one Cupcake Stand from chipboard. (Ignore the bells - I didn't end up using them!)

Assemble the boxes and set aside.

Paint the cupcake stand with gold paint. When dry, assemble and cover with Ranger's Platinum Dry Stickles glitter.

The top block is decorated with an idea-ology Curio Knob, lace trim, one of the key holes from the Locket Keys set, and a paper flower. I also use a Picket Fence Distress dabber to lighten the edges and corners.

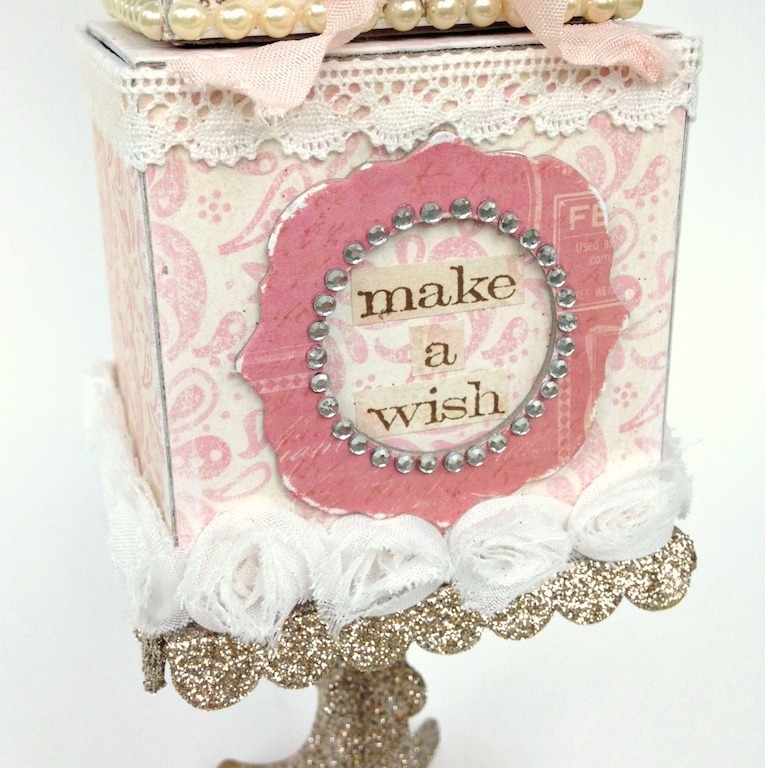
On the middle block, I added an idea-ology Plaquette (my daughter will be turning 25, perfect!) that was tied with Crinkle Ribbon that I dyed using Spun Sugar Distress Stain. On the top I added some trim that I found at the Target Dollar Spot. Along the bottom I added adhesive pearl trim.

Before I decorated the bottom block, I adhered to the cupcake stand. When it was dry, I added fabric rose trim (from Tim Holtz, discontinued) on the bottom, and lace trim on the top. The frame was cut from paper covered chipboard using Eileen's Decorative Frame die. I added tiny rhinestones and a sentiment stamp from Tim Holtz's Simple Sayings stamp set.

I am so excited to send this to my daughter! I glued the bottom two boxes shut and left the top one open to add her gift. If you wanted to though, you could probably leave them all open and fill the whole thing with pressies! I think this would be beautiful for a wedding gift as well. I'm sure the bride and groom would treasure it.

The supplies I used can be found via the links below at Inspiration Emporium, Sizzix, and Amazon. When you use my coupon code - stamptramp - at IE, you'll save 10% on your order!


You still have a few days to enter Eileen's Art With Heart challenge. You can read all about it and post your submissions HERE. I hope you can join us!

Thanks so much for stopping by today - have a fantastic week!

Sunday, June 22, 2014

Published! + a Winner!

Hi all! Last year I was thrilled to be asked to join in the Ranger Designer Challenge. It was always a dream of mine to have that honor! The challenge product was the new Distress Paint collection that was released at the show.

At the time, I was pretty much in mad love with Tim Holtz's Jumbo Tattered Florals die from Sizzix and decided to use the paints to create some pretty, yet grungy, metal flowers. This piece was definitely a challenge for me and I was a little unsure of it when it was finished. I was in such a rush to finish it that I only had a chance to take this quick pic before I wrapped it up and shipped it off, hoping that it would show my love of the paints and measure up to the talent I knew I would be surrounded by at CHA.

So, imagine my surprise when I got an email from Somerset Studio saying they were going to use it in an article featuring a selection of the challenge canvases! I was beyond thrilled. It's a fantastic article and so inspiring to see how each artist interpreted the theme. This issue will be on newsstands July 1st and I highly recommend you grab a copy.

A friend of mine pointed out that the magazine had also used a portion of my canvas to create one of their free Artists' Papers. How cool is that?! They did a wonderful job with it too - the paper is beautiful.

Okay, now for the winner of the new Mini Distress Inks!

Comment #1 was from Bearcrazyman who said:
Very cool thanks for the chance to win

Congratulations, Bear! I will be contacting you for your mailing info so I can get these little cuties to you asap!

I plan to do a tutorial soon for these painted metal flowers, but in the meantime, you can find the products I used to create them from Inspiration Emporium via the links below. Remember to use my coupon code - stamptramp - to save 10% on your order!


Here is one more photo that Michelle over at Mixed Media Art was kind enough to let me share. Since I didn't get to attend this CHA show, it was really nice to find someone who had a pic so I could see how my canvas looked on display.

Thanks so much for all the wonderful comments you all left on the giveaway post. I wish I had an ink set for every single person! Have a wonderful, arty week!