Sunday, November 30, 2014

Eileen Hull Sizzix Projects

Hi all! I just wanted to share another roundup of some past Sizzix projects - this time from Eileen Hull. These are some of my all-time favorites. I absolutely adore Eileen's dies!
 
1. Journey ATB
2. ScoreBoards Apothecary Cabinet
3. Steampunk Drawers
4. Grungy Embellishment Chest
5. Vintage French Storage Caddy
6. Shadow Box ATB

Just in case you missed it, today is the last day of the huge Sizzix Black Friday sale. There are some fantastic bargains on the dies I used to make the projects above. The Candy Drawer is only $6! You can't beat that price.

Click below for the deals!


Thanks so much for visiting today. I have a SUPER fun Christmas project coming up tomorrow, so be sure and stop by!

Thursday, November 27, 2014

Sizzix Christmas Projects

Hi all! Happy Thanksgiving to my American visitors! With the big sale going on at Sizzix for the next few days, I thought it would be fun to share a few of my favorite Christmas projects using dies and Texture Fades from from Tim Holtz. Now is the perfect time to start your holiday crafting!

Here are the links to these projects. Most of them are full tutorials, so you'll have no problem recreating them for your own home decor, or to give as gifts.

1. Victorian Carolers Shadowbox
2. Snowy Winter Luminary
3. Joy Banner
4. Merry Wall Hanging
5. Glittery Ice Skates Card
6. Faux Wood Rule Christmas Tree

Click the banner below to head to Sizzix and start your shopping!

Thanks so much for stopping by today. I hope you enjoyed revisiting some of my favorite projects. I love creating at this time of the year and I have some fun new projects coming your way in the next few weeks, so stay tuned. Happy Thanksgiving to you and have a wonderful weekend!

Note: This post contains affiliate links. When you purchase from an affiliate, I make a small commission. This commission helps to keep my blog running, and I very much appreciate it!

Tuesday, November 18, 2014

Eileen Hull Art With Heart Challenge - Favorite Recipes

Hi all! This month's Art With Heart Challenge from Eileen Hull is all about your favorite recipe. Eileen's fun Vintage Kitchen collection is going to be released this month and the Inspiration Team members will all sharing our 'recipe' for our samples using these dies.

I love all the new dies in this collection, but the canister die might just be my favorite. There are so many things you can do with this shape! I decided to create a tea canister using the pretty Botanical Tea paper from Graphic 45. I started by cutting the pieces from cream mat board and then painting them with Picket Fence Distress paint. After I assembled the canister, I sanded all the edges to give it a shabby look. I covered each of the sides and the lid with paper, and added feet to the bottom.

Next, I added a painted knob to the top and tied it with idea-ology Crinkle Ribbon. I fussy cut the flowers and butterfly and glued them to the ribbon. To finish the lid, I adhered lace trim to the edge.

The label was cut from cream cardstock using one of the dies from Eileen's Kitchen Labels set. I stamped it with the word 'tea' using Fern Green Archival ink. I adhered it to the box along with a couple of pearl beads. The bird and flower were cut from another piece of paper and layered onto the box with foam dots.

On the side I added some stamps that were cut from the same G45 collection, along with a butterfly and flowers.

All of the supplies I used can be found at Inspiration Emporium and Sizzix via the links below. Remember to use my coupon code - stamptramp - at IE to save 10% on your order!


Make sure you stop by the Art With Heart challenge this month and join in the fun. You could win a very special prize from Eileen!

Monday, November 17, 2014

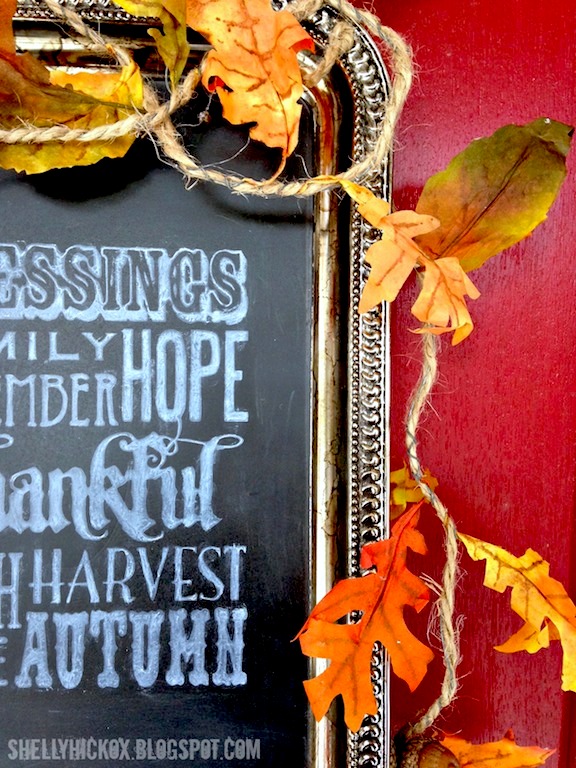
Faux Silver Autumn Chalkboard Tray

Happy Monday, all! This weekend I was flipping through the latest Country Living magazine and came across this gorgeous chalkboard tray, perfect for fall decorating:

Photo Credit: Country Living
I fell in love with it and had to make it right that minute! I have several vintage silver trays, but none I really wanted to sacrifice for a craft project. What I did have was a shiny silver tray from The Dollar Tree that, with a bit of ink and paint, could easily pass for an old heirloom.

Here's how it came together:

Begin by taping off the outer edge of the tray with painter's tape. If there are a few edges that don't get completely covered, that's fine. A little bit of overspray will add to the vintage look of the tray.

Next, paint the inside of the tray with Krylon chalkboard paint. Several light coats are best. Remove tape and let dry completely.

Mask off the painted area of the tray with sticky notes. Apply Latte and Slate alcohol inks to an applicator and apply to the edges of the tray to give it an antique, tarnished look.

When the ink is dry, apply Black Soot Distress Paint to the entire inked area. Let it sit for a moment and then wipe off. Now your shiny metal tray looks like you unearthed it from an antique store or flea market!

Finally, remove the sticky notes and stamp the tray using Tim Holtz's Thankful text stamp and ColorBox Alabaster Chalk ink. Let the ink dry a bit and then smudge lightly with a cotton swab to give it a handwritten chalk look. Use a heat gun to set the ink.

I am so in love with how this turned out! I punched a couple holes with a nail and tied on some jute twine for a hanger. To decorate the tray, I used the Tattered Leaf garland I made a couple years ago. I'm amazed at how vibrant the leaves still are after two years. And how cool is that tarnished silver look? I'm already planning one for Christmas! I'm also thrilled with how text image looks stamped with chalk ink. For anyone like me who is handwriting-impaired, this is a lifesaver. :)

The supplies I used can be found at Inspiration Emporium and Amazon via the links below. Don't forget to use my coupon code - stamptramp - at IE to save 10% on your order.


Thanks so much for stopping by today - have a wonderful week!

Monday, November 10, 2014

Pop it Ups Designer Challenge - Red, White, or Blue

Hi everyone! Today I'm sharing a card I made for this month's Karen Burniston Designer Challenge. For November, the DC team could choose to make an all-white, red, or blue card. I had these snowy, glittery trees on my mind, so I chose white. An all-white card was definitely a challenge for this grungy girl - not a trace of brown ink anywhere!

I thought Karen's Accordion Circle Card die might just be the perfect size for the trees and I was right! I started by cutting the panels from Elizabeth Craft Designs' 100 lb soft finish cardstock (this weight is perfect for Pop it Ups cards). Next, I used the included circle die to cut out the center of the card, creating a thin frame.

To make the trees, I covered both sides of a piece of white cardstock with adhesive using my Xyron, then cut 8 trees using the largest tree die from Karen's Evergreen Pivot card set. I scored them down the center, then folded them and removed the release paper from the mountain fold side. I adhered them to each other (4 die cuts = 1 tree), carefully aligning the edges. After the trees were assembled, I removed the inside release paper and covered them with glitter. The silk microfine glitter is so fine that it adheres to the Xyron adhesive perfectly. No mess!

I created the filigree frames the same way, cutting them from cardstock that had adhesive on both sides, then adhering one side to the card. After all the frames were in place, I removed the top layer of release paper and covered the frames with glitter. I have to give full credit to Karen for this brilliant idea. It makes sticking down intricate dies so easy.

To complete my card, I adhered a transparency window to the center frame. The sentiment was stamped using gray StazOn. I stamped the deer with the same ink, then cut him out and adhered him to the card. Finally, I added my trees, which are suspended on silver cord that hides perfectly behind the top fold.

I hope you can see how pretty all that glitter is. Be sure and click on the photos for larger views. It's one of those cards that just lights up in person!

All the supplies I used to make my card are available at Elizabeth Craft Designs and Simon Says Stamp.


Thanks so much for stopping by! Don't forget to check the Elizabeth Craft Designs blog on Wednesday, when Karen will be sharing a stunning card technique!