When I was thinking of today's ornament, I wanted to do a metal variation of my faux ruler technique using Tim Holtz's Rulers Texture Fade from Sizzix. Except I couldn't find it. The one folder I needed and it was nowhere to be found! And I usually keep my Texture Fades very organized. I rifled through piles and combed through stacks. In one of the piles I found a stamped scrap where I'd used Tim's measuring tape stamp. It all clicked - I could stamp and emboss the rulers! - and a star was born. Here's how I made my faux metal rulers:
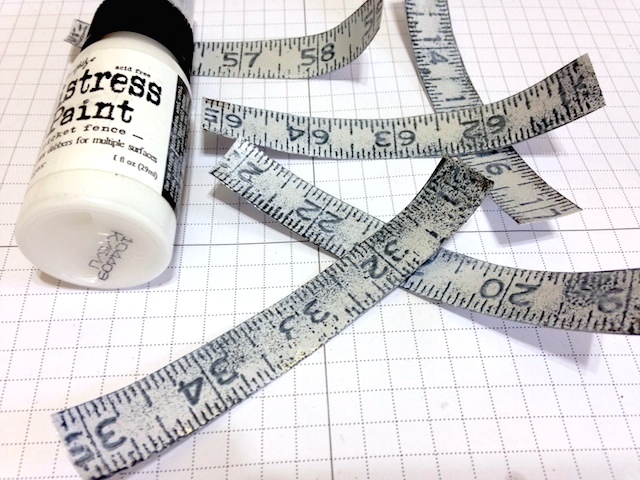
Begin by stamping the ruler image onto metal foil tape using black pigment ink. Emboss with Ranger's black embossing powder.
Next, cut out the individual rulers and paint with Picket Fence Distress Paint. When they are mostly dry, gently wipe some of the paint off the embossed areas.
Cut strips of chipboard or mat board to the size of the embossed tape and adhere the tape to the strips. Paint the edges with Black Soot Distress Paint. If the numbers seem too faint, use a sanding block to carefully sand off some of the paint.
Pierce holes in the rulers using a craft pick or punch. Line the rulers up as shown to determine where to place the holes. Use brads to attach the rulers, forming them into a star shape.
Finally, paint idea-ology Alpha Parts letters to spell 'joy' with red acrylic paint and adhere to star. Attach a length of jute twine to create a hanger. Dab a bit of white paint on the brads so they blend in. You also might want to add a touch of glue or a glue dot between a couple of the rulers to keep it all in place.
So, what do you think of today's happy accident? I honestly owe most of my ideas to my messiness. If I don't have things out where I can see them, I forget I have them. And all those scraps and bits from discarded projects? You never know when they'll be just the thing to get your mojo off and running!
All the supplies I used can be found at Inspiration Emporium via the links below. Don't forget to use my coupon code - stamptramp - to save 10% on your order.
Above are the first four ornaments in this series. Be sure and check them out if you've missed any! I'll see you tomorrow for Day 6.
Have a great weekend!


Stinking cute! So simple and it's just way too cute! Thanks for the ideas!
ReplyDeleteThis is awesome Shelly! A happy accident indeed!
ReplyDeleteOh yeah, super duper coolness! This would be cool in a tree form too.
ReplyDeleteAdorable! Fantastic idea.
ReplyDeleteWhat a great idea I'm going to definitely try this thanks for the inspiration and I love all of your ornaments
ReplyDeleteLoving ALL your ornaments girl! TFS
ReplyDeleteThanks for reinforcing my penchant toward messiness. I never throw anything away either and I can just see myself rifling through stacks of craft supplies...in fact it I did it a time or two in the last couple of weeks 😊 But all is forgiven and is right with the (craft) world when the result is as stunning as your faux metal ruler ornament. Another seriously cool piece of faux fun!
ReplyDeleteoh WOW!!!! love that star, beautiful!!! gotta go find a ruler stamp... =)
ReplyDeleteFantastic ornament! Thanks for the inspiration!
ReplyDeleteI had got as far as thinking about the stamp when I saw the picture on my feed! Nice to know that's what you ended up using....I might even manage to find time to make one :-)
ReplyDeleteSally
I'm a slob too....lol!!!! It even runs over into the den! What are you gonna do? Lol! Love this ruler star! I've seen these before as well! Awesome!
ReplyDeleteAnother great idea....hoping for some time in the Fun Room tomorrow so I can play too
ReplyDeleteI love "happy accidents"! I am in process of actually "finding" my studio after moving here 3 years ago. I am determined, by the end of next month to get back to creating once said studio is fully organized. Many containers are proving to hold "treasures" for crafting that I forgot about.
ReplyDeleteBetween you and TH, I have a lot of things I want to make.
Enjoying this series.
"Happy Holidays!"