Hi all! It seems like it's been ages since I posted - I guess it kind of has been! We got back from a long trip just before my last post and I feel like I've been doing nothing but trying to catch up since then. One of the projects I've been working on is this spooky curio cabinet created with Eileen Hull's ScoreBoards dies and Graphic 45's Rare Oddities paper.
The whole Inspiration Team was given various G45 papers to work with. I got lucky and scored a pad of the new Rare Oddities paper. Yay! I had already bought the smaller pads and one of the stamp sets and I couldn't wait to get to work!
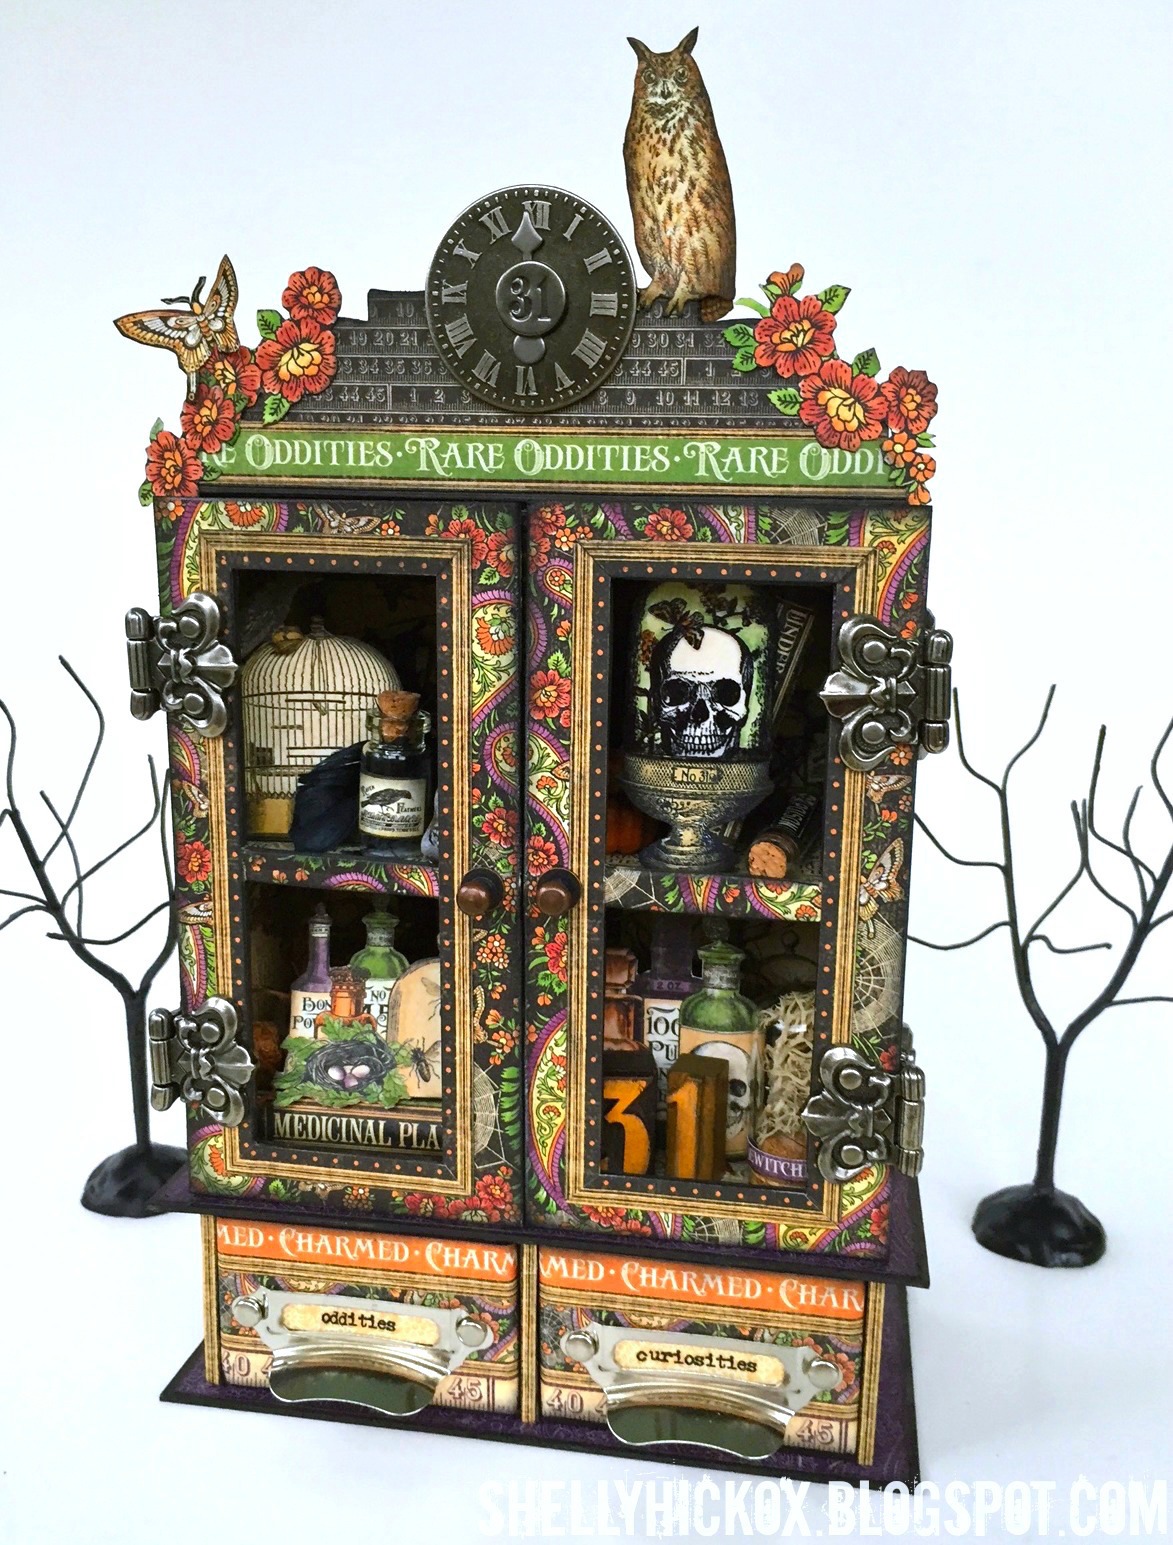
I decided to build a little apothecary chest with doors using Eileen's 3D Blocks die plus her Candy Drawer die. You know how much I love stacking these dies and creating new combinations. So much fun!
After I decorated the cubbies, I knew I needed to have something to fill the drawers, so I created a simple accordion fold book for each of them. I used my new stamps and Wendy Vecchi's Archival inks to create a background for photos.
This was kind of a create as you go project, so I don't have a full tutorial with measurements, but I did take a few pics along the way so you can see how it came together.
The die I used cuts three different sized boxes. I used the larges one. After I assembled them, I glued them together and painted all the edges. I used chipboard and Tim Holtz's Sized Rectangle die to create doors.
The drawers were cut using Eileen's Candy Drawer die. I added chipboard panels on the bottom and top to give interest and stability. I was going to add feet and totally forgot! Oops! To create the decorative top piece, I used Tim's Plaque and Postage die to cut the shape from chipboard. I scored it and folded back a flap to attach it to the top.
After you're done assembling your curio cabinet, all that's left to do
is get your scissors out and start fussy cutting! I mixed and matched
lots of different papers from all three paper packs.
Here is a shot of the cabinet, all decorated and assembled. Tim Holtz's idea-ology hinges are perfect for the doors and his hitch fasteners make perfect knobs.
It's so much fun to fill the compartments with spooky stuff! I made little books out of the paper and then stacked fussy cut bits and pieces on top. The skull dome is actually one of the stamps from the set I bought. I stamped it and colored it to match the one on the paper. Then, I stamped it again on acetate, cut out just the dome portion, and layered it on top of the stamped image. It really makes it look 3D! Other bits I added were idea-ology vials, letterpress numbers, a corked dome, and some mini pumpkins.
You can find the Blocks die at Sizzix. The rest of the supplies can be found at Simon Says Stamp, with the exception of the chipboard, which I always get at Amazon.
I hope you enjoyed my Rare Oddities project. Thanks so much to
Graphic 45 for supplying us with the paper. I was also lucky to get a pad of their Gilded Lily paper which I think would make an equally gorgeous cabinet with a totally different feel!
Have you entered your spooky or holiday art into the Eileen Hull Art with Heart challenge yet? There is a mystery prize pack up for grabs! You can find all the details
HERE.
Thanks so much for stopping by today - come back tomorrow when I'll have a wickedly cool project for the latest Frilly and Funkie challenge!