Showing posts with label Thanksgiving. Show all posts

Thursday, November 24, 2016

Happy Thanksgiving!

Happy Thanksgiving to my American followers! I hope you're all having a wonderful holiday. I wanted to share a quick post with my version of Tim's November tag. I thought they would be adorable as place cards on my Thanksgiving table so I whipped a few up last night!

I think my favorite thing about my place cards is this adorable little pearl acorn. When I saw the acorn charm on Mylissa's version of Tim's tag, I was inspired to make one of my little pearl acorns using the new pearl baubles. I love that there is no hole to hide like a regular pearl bead. I used caramel alcohol ink to color it, then glued it into a real cap. I screwed an eye screw into it so that it could be hung from the twine. So cute - thanks for the inspiration, Mylissa! :)

Another fave is the little fork, which was cut using an older Karen Burniston die. It's not available through Sizzix anymore, but I did find someone selling it on Amazon (link below). I cut it from foil-covered chipboard and painted it with black distress paint to give it a tarnished look.

The rest of my card was done following Tim's instructions, other than I used the distress spray stains and a water brush to color my leaf - I'm horrible with  markers and this way is so much easier for me!

The supplies I used can be found at Amazon, Sizzix, and Simon Says Stamp via the links below. BTW, the Alphanumeric set is on sale at Sizzix right now for an amazing price - it's a great time to snap it up!


Thanks so much for stopping by today - have a great weekend!

Monday, November 7, 2016

Pop it Ups Thanksgiving Treat Pouch

Hi all! It's time again for Karen Burniston's Designer Challenge. For our first challenge of the month, the theme is 'Hats'. We could use any of Karen's hat dies, or make a hat out of a totally different die. I decided to use the bucket from the Palm Tree and Pail die set to make a pilgrim hat to embellish a little Thanksgiving treat pouch. So cute!

I took a few pics while I was making it to show you how it came together.

I started by cutting a piece of kraft cardstock to 4.25" x 11". I scored it at 5" and 6" to create a base for the pouch. I used Karen's wonderful Stripes/Plaid die to create a pattern on the front using Distress inks. Karen has a tutorial HERE showing how to create a plaid pattern. I couldn't believe how easy it was!

After my plaid was complete, I cut a window in the front using the third largest die in the Labels and Circles set. I used the same die, plus the next larger size to cut a frame for the opening. I also cut several pumpkins using the die from the Halloween charms set. I made the pilgrim hat by cutting the bucket from black kraft core'dinations and cutting off the handles. I used the buckle and trim from the Props 9 set to finish it.

After adhering the frame to the front, I attached the embellishments to the corner of the pouch using glue and pop dots. I also added some wheat cut using the die from the Props 6 set, and a flower and leaves cut from burlap using dies from the Flower Pot Pop Stand set. To finish it, I rounded the corners, added a bag of nuts, and tied it with some pretty ribbon.

I'm so excited with how this turned out! I absolutely love the look of the plaid background and can't wait to try it for Christmas too!

The supplies I used can be found at Elizabeth Craft Designs and Simon Says Stamp via the links below.


Thanks so much for stopping by today! Be sure and check out Karen's blog tomorrow for lots of great inspiration from the team and a new tutorial from Karen.

Monday, November 17, 2014

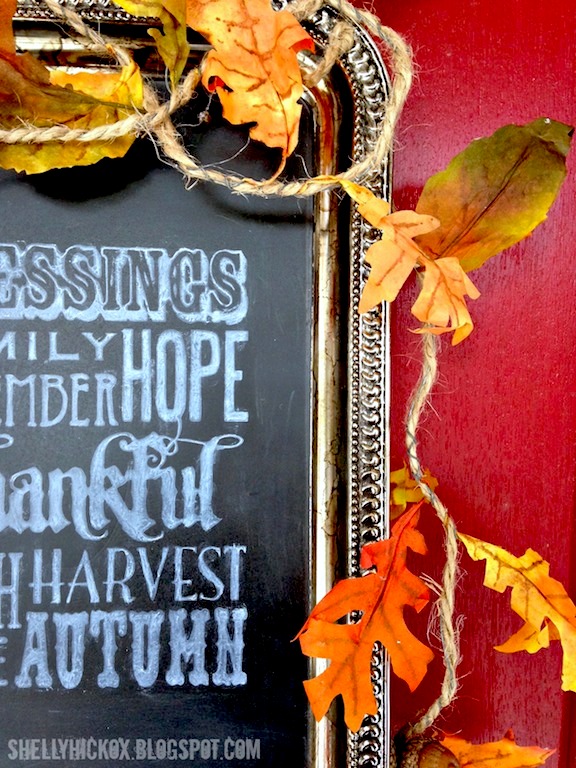
Faux Silver Autumn Chalkboard Tray

Happy Monday, all! This weekend I was flipping through the latest Country Living magazine and came across this gorgeous chalkboard tray, perfect for fall decorating:

Photo Credit: Country Living
I fell in love with it and had to make it right that minute! I have several vintage silver trays, but none I really wanted to sacrifice for a craft project. What I did have was a shiny silver tray from The Dollar Tree that, with a bit of ink and paint, could easily pass for an old heirloom.

Here's how it came together:

Begin by taping off the outer edge of the tray with painter's tape. If there are a few edges that don't get completely covered, that's fine. A little bit of overspray will add to the vintage look of the tray.

Next, paint the inside of the tray with Krylon chalkboard paint. Several light coats are best. Remove tape and let dry completely.

Mask off the painted area of the tray with sticky notes. Apply Latte and Slate alcohol inks to an applicator and apply to the edges of the tray to give it an antique, tarnished look.

When the ink is dry, apply Black Soot Distress Paint to the entire inked area. Let it sit for a moment and then wipe off. Now your shiny metal tray looks like you unearthed it from an antique store or flea market!

Finally, remove the sticky notes and stamp the tray using Tim Holtz's Thankful text stamp and ColorBox Alabaster Chalk ink. Let the ink dry a bit and then smudge lightly with a cotton swab to give it a handwritten chalk look. Use a heat gun to set the ink.

I am so in love with how this turned out! I punched a couple holes with a nail and tied on some jute twine for a hanger. To decorate the tray, I used the Tattered Leaf garland I made a couple years ago. I'm amazed at how vibrant the leaves still are after two years. And how cool is that tarnished silver look? I'm already planning one for Christmas! I'm also thrilled with how text image looks stamped with chalk ink. For anyone like me who is handwriting-impaired, this is a lifesaver. :)

The supplies I used can be found at Inspiration Emporium and Amazon via the links below. Don't forget to use my coupon code - stamptramp - at IE to save 10% on your order.


Thanks so much for stopping by today - have a wonderful week!