

When I started making mine, I decided to take a few quick pics with my phone in case anyone wanted a tutorial. The idea for using the screwdriver to insert the filters (much easier and less dangerous than hot glue!) came from Design Dining & Diapers. Her tutorial and finished wreath are amazing!
Spooktacular Coffee Filter Wreath
Supplies:
10" Straw Wreath
Small White Basket-Style Coffee Filters
Leftover Coffee
Screwdriver
Ranger Perfect Pearls Mist - Perfect Pearl Color
Ranger Walnut Stain Distress Ink
Ranger Inking Tool
Black Velvet Ribbon, 1 Yard
Sizzix Gothic Boo Die
Sizzix Mini Spider & 31 Die
Ranger Adirondack Dabber - Pitch Black
Ranger Glue 'n Seal
Martha Stewart Glitter - Onyx
Stampers Anonymous Spider Web Stamp
Mini Iron
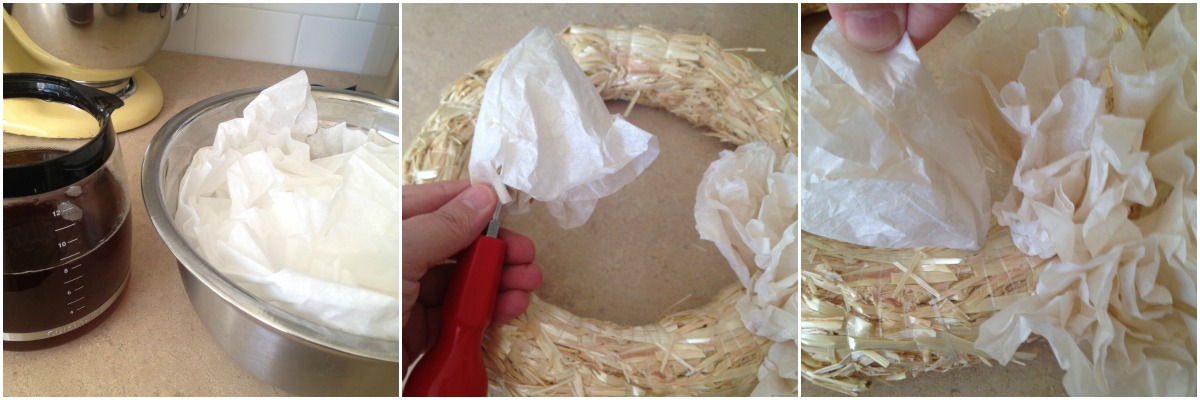
1. Dilute coffee to desired strength. Dye filters and let dry
2. When dry, use a screwdriver to insert into straw wreath
3. Place filters about 2" apart
2. When dry, use a screwdriver to insert into straw wreath
3. Place filters about 2" apart

4. Continue covering wreath with filters
5. Oooh, pretty!
6. Ink edges of filters with Walnut Stain Distress ink to give a spooky, aged look

7. Mist entire wreath with Perfect Pearl Mist
8. I love the shimmer the PP Mist gives the filters!
9. Cut Gothic Boo and spiders from Grungeboard and paint with Pitch Black Dabber

10. When dry, apply Glue 'n Seal and cover with black glitter
***Do this step at your own risk!***
11. Mist the back of black velvet ribbon with water. Lay face down on Stampers Anonymous spider web stamp. Press with a hot iron for about 15 seconds.
12. How cool! Embossed velvet!

I hope you enjoyed my tutorial! The supplies I used can be found at Inspiration Emporium via the links below. Be sure and use my coupon code - stamptramp - to save a spooktacular 10% off your order!
        |
InLinkz.com
We really want you to play along with our challenge - it's so much fun seeing what everyone comes up with. PLUS, you could be the lucky winner of a $50 shopping spree - definitely worth playing for!
We really want you to play along with our challenge - it's so much fun seeing what everyone comes up with. PLUS, you could be the lucky winner of a $50 shopping spree - definitely worth playing for!


