Showing posts with label Wendy Vecchi. Show all posts

Thursday, June 11, 2015

Eat More Cake!

Hi all! I came across this card on Pinterest that was pinned from a store's site and realized I'd never shared it on my blog! Sometimes there are so many samples that it's hard to keep track of what I've posted and what I haven't.

When I saw this set, I had no idea how insanely popular it was going be! It's such a departure from Tim's usual style that it took me awhile to figure out what to do with it. However, my deadline was crazy tight so I didn't have time to mull it over long. Thankfully, I came across a piece of cardstock that I'd used to experiment with Wendy Vecchi's Archival reinker technique (see the video HERE) and thought it was perfect.

I also had a bunch of Tim's new stencils to play with, so I used the Tiles pattern to add more texture with a Picket Fence dabber. I used the happy birthday sentiment from the Simple Sayings set and repeatedly stamped it on the background. After that, I added my bird with his little hat and stamped the perfect sentiment. So cute!

All the supplies I used can be found at Simon Say Stamp via the links below.


Thanks so much for stopping by today. I hope you enjoyed my crazy bird! I still have more of my samples to share - I guess I need to get busy and post them! :)

Friday, May 1, 2015

Mini May Day Trophy Cups


Happy May Day, everyone! I hope you're all having a wonderful spring. Here in Mississippi we've been having one of the nicest seasons I can remember. Gorgeous weather that's perfect for working in the garden.

Where I grew up in Oregon, our elementary school had an annual May Day celebration. It was a huge ordeal - we spent weeks working on decorations and practicing our singing and dancing routines. We had a May Day court, with a Queen and Prime Minister (why not a King? No idea.), and a princess from each grade. When I was in the first grade, I came home from school and announced to my mom that I was the princess of the school! She had no idea what I was talking about...I'm pretty sure I thought I was the princess of quite a lot back then. I finally convinced her that it was a real thing and I had to have a special dress, gloves, and shoes. I was truly in heaven!

Each year the princesses carried a different flower arrangement. I can still remember mine - mostly because, even back then, I was taking things apart to figure out how they were made. It was a plastic doily (these were the 70s after all) that was folded in half, and then in half again, to make a pie-shaped basket. The handle was wire bent into a hook shape and wrapped with ribbon. I'm sure the basket must have been filled with plastic flowers. That part I don't remember. I was all about the structure.

To celebrate this May Day, I decided to alter some of Tim Holtz's adorable Trophy Cups using DecoArt Chalky Finish Paint and some sweet little flowers made with a die from Karen Burniston and a special technique using Wendy Vecchi's embossing powder. I thought they would make the most adorable little spring gifts to give my friends. Here's how I put them together.

Begin by painting all the cups with Lace Chalky Finish Paint. It make take several coats to cover the metallic finish.

When the cups are dry, paint with various colors of chalk paint. Color various photos from Tim Holtz's Photobooth cards, lightly sand edges, and add rub-ons.

Next, we'll make some tiny flowers. I have some vintage flowers I really love. They are adorable, but I didn't have enough for this project, plus they are so sweet, I hate to part with them. Fortunately, I had some felt and a tiny flower die from Karen Burniston, so I decided to try to duplicate them. I think I came pretty darn close, and they cost next to nothing!

To make the flowers, use the tiny flower die from Karen Burniston's Butterfly Pivot Card die set to cut several flowers from pink felt. Use a large hole punch to punch circles from a piece of crinoline. Tammy Tutterow introduced me to this wonderful fabric that is the perfect stiffness for flowers and other crafty uses.

Next, use a paintbrush to lightly pounce the flowers with paint.

Using a heat gun in a well-ventilated room, very carefully heat the flowers for just a few seconds. Since the felt is synthetic, it will melt. You want just a tiny bit of puckering on the edges.

To make stamens for the flowers, ink the end of a piece of paper wrapped floral wire with embossing ink. Dip the end into Wendy Vecchi's Tree Branch embossing powder and briefly heat (if you heat it for too long the paper will burn). While the ep is still hot, dip the end back into the powder and heat again. Repeat several times, building up the end to form a smooth tip as shown.

To assemble the flowers, glue the round crinoline circles to the flowers. Punch a hole through them with a piercing tool and insert the stamen. Add a dab of glue and you're done!

To assemble the trophy cups, hot glue a piece of styrofoam in the cup and cover with moss. Insert a photo into a memo pin and tie with ribbon. Insert memo pin into cup and add flowers. Cut the bird, butterfly, and banner from Graphic 45's Botanical Tea papers and glue into place.

All the supplies I used can be found at Simon Says Stamp and Amazon via the links below. These are affiliate links and I do earn a small commission when you shop. I greatly appreciate when you do - it helps offset the cost of running a blog and lets me continue to bring you lots of great projects and tutorials!


Thanks so much for stopping by today. I hope you have an absolutely gorgeous weekend!

Monday, April 20, 2015

Double Embossed Dog Tag Tutorial


Hi all! I have been having a lot of fun in the studio lately playing with some new products and I have a very cool project to share with you! A couple of months ago, Els from Elizabeth Craft Designs was kind enough to send me a set of her new jewelry dies. Of course, my first thought was, 'what can I cut with these?!' They are wafer thin dies, but I really wanted to see if they would cut aluminum flashing. I was shocked when they cut it like it was butter! I set the dog tags aside and got distracted with something else (typical). Last week Wendy Vecchi sent me a selection of her embossing powders (it was like Christmas!) and a little light bulb went off.

My first experiment yielded a cool necklace (which I'll post soon). After that, I was inspired to try combining techniques and came up with what you see above. I have fallen madly in love with Tim Holtz's embossed texture paste technique from his March tag and thought it would be fun to try over the enameling. I wanted it to look like raised lettering with a rusty enamel surface behind it. Here's how it did it:

Begin by cutting a dog tag from aluminum flashing (I got mine from Lowe's) using the largest dog tag die. Cover it with embossing ink.

Next, sprinkle Wendy Vecchi's Orange Blossom embossing powder over the tag, making sure to leave a few areas open. Add random sprinkles of Watering Can embossing powder over the tag. Tap off excess and use a heat gun to melt the powders. Make sure you're working on a non-stick craft sheet and be careful - the metal gets very hot! Let tag cool before proceeding to the next step.

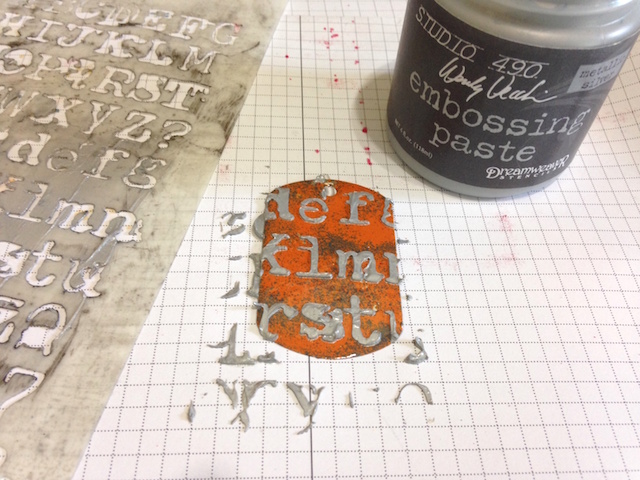
Using Tim Holtz's embossed texture paste technique, apply Wendy's silver embossing paste over the top of the embossed tag.

While the paste is still wet, cover with silver embossing power. Tap off excess and allow paste to dry completely.

When paste is try, heat to melt the embossing powder. SO cool! Adhere gears to the tag using Tiny Fasteners. After I'd added the gears, I decided I wanted a little more texture, so I reheated the tag and sprinkled Vintage Photo Distress embossing powder in random spots. I love how grungy it looks after adding it.

To create a necklace, add a jump ring and ball chain and you're set! If you want to give the back a finished look, you can add another layer of flashing, or a piece of cardstock or felt. I left mine as is because I'm a bit lazy. ;) If you didn't want to wear this, you could use it on a card, in a mixed media piece...pretty much anywhere!

How cool is that embossing powder? I've been intrigued by torch enameling lately and think this gives a similar look, but is much easier. I can't wait to experiment even more!

The dies I used can be found at Elizabeth Craft Designs. The Dog Tag set is only $8.75 and you get three sizes of dies - I think that's an incredible deal! The rest of the products can be found at Simon Says Stamp. I also added a link to flashing on Amazon in case you can't find it at your local hardware store. It's quite inexpensive for the amount you get. You'll never run out of that stuff!


Thanks so much for stopping by today - have a great week!