Showing posts with label Mixed Media Monthly. Show all posts

Monday, June 1, 2015

Mixed Media Monthly Guest Artist

Hi all! Last year, I was thrilled to be the first guest artist at the brand new Mixed Media Monthly Challenge blog. Fast forward to one year later and I'm back again for their anniversary! To celebrate, this month's theme is to use any of the challenge themes from the past year. The month I was a guest the theme was spray inks, so I decided to revisit that. I used some of my favorite things - dies from Eileen Hulls, misters from DecoArt, and embellishments from Tim Holtz. Here's a quick tutorial for this pretty, shabby box:

Begin by cutting two large label shapes from thin chipboard using Eileen Hull's Ornamental Labels die, and two of the long connecting pieces using Eileen's Make it 3D die. Trim off a segment from each end of one of the connecting strips.

Cut all the tabs but one from one side of the connecting strips as shown. Fold the tabs on the other edge and adhere to one of the labels, creating a box (you'll be piecing two together to make a strip long enough to completely cover the base).

Cover the box with vintage French book pages. Cut a frame using the label die and adhere it to the remaining large chipboard label. This will be the top of the box. Paint everything with DecoArt white gesso.

Spray the box top and bottom with various DecoArt Media misters. Rub DecoArt gold paint on the frame. Add embellishments as shown. Finish the box by adhering the top to the tab at the back of the box.

After my box was finished I decided I wanted to create a coordinating necklace to give as a gift. I used Eileen's new flower die and cut layers from aluminum flashing. I inked each piece with Versamark and covered them with white embossing powder. After melting the ep, I colored each layer using alcohol ink. I connected the layers, then attached a chain and was done!

Eileen's Make it 3D is really such a cool die. It can turn just about any die you own into a box. There are so many fun things you can do with it! And those DecoArt misters are so gorgeous. I wish you could see how pretty this is in real life!

The supplies I used can be found at Scrapbook.com and Amazon via the links below.


Thanks so much for stopping by today. Be sure and visit the Mixed Media Monthly blog and check out all the wonderful artwork by the other guest artists and the MMM team. Tons of inspiration!

Sunday, June 1, 2014

Mixed Media Monthly Guest Artist


Hi all! I'm SO excited to share a new challenge blog with you. It's called The Mixed Media Monthly Challenge and I was thrilled to be invited to be their first guest artist. Each month they'll have a different theme and a prize for one lucky participant. This month our own Inspiration Emporium is the sponsor, so I hope you'll join in!

The theme for this month's challenge was spray inks. I decided to experiment with a resist technique - dry embossing and then heat embossing the raised area. I absolutely love how my piece turned out and shot a quick tutorial to show you how I did it.

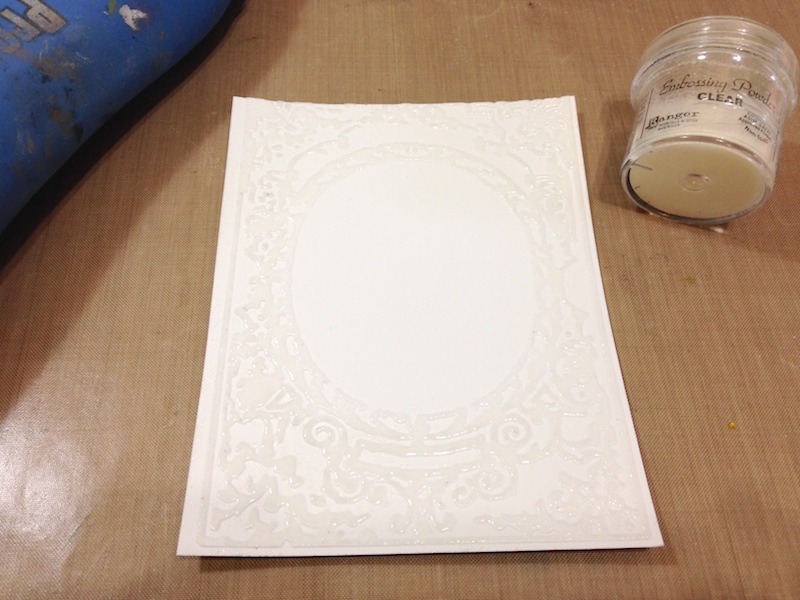
Begin by embossing a piece of Ranger's Distress Watercolor paper using one the Book Covers Texture Fades. Open the folder, but leave paper in place. This will help support the raised design when you brayer it. Load brayer with clear embossing ink and roll over the embossed paper.

Next, cover inked design with clear embossing powder and heat to melt powder. If you have any stray powder, brush away prior to embossing.

Mist paper with desired colors. Since I wanted a more muted palette for this piece, I chose to dilute my Adirondack color washes to more of a pastel hue. Dab with a paper towel to remove ink from embossed area and let dry. If the color is not intense enough, continue to spritz until you like it.

Here is the embossed piece after it's dry. How cool is that resist?!

I felt like the embossing was just too shiny, so I covered the panel with paper and used a hot iron to melt and remove the ink - just like you'd do for the faux batik technique. It also flattened the embossing just a bit, which I really loved!

To complete the panel, I covered a piece of medium weight chipboard with burlap paper - instant burlap panel! - and added Tim Holtz's new Mini Corners. I layered the embossed piece (which was stamped with a quote from Artistic Outpost) to a piece of Prima paper and then to the panel. I added a few strips of Tissue Tape, some paper flowers created with the Sizzix Tattered Flower Garland die (you can find the full tutorial for these HERE), and some idea-ology embellishments.

As always, you can find most of the supplies I used at Inspiration Emporium via the links below. Be sure to use my coupon code - stamptramp - to save 10% on your order! I also have links to Sizzix for the embossing folders and Amazon for the chipboard. Please note that the discount will not work on these sites.


Thanks so much for stopping by today - have a great week!