Sunday, December 24, 2017

Merry Christmas!


Hi everyone! I have one last Christmas project to share with you before the holidays are over. One of my favorite things about Karen Burniston's dies is how versatile the sets are. Amazing as pop-ups, yes - but you can also use the individual dies in lots of other ways.

In my last post, I used the large tag die with lightweight chipboard and created a faux wood effect. For this project, I decided to use the same tag die, but as a window for a card that folds flat to mail, but pops out to create a shadow box that can be displayed. Read on to see how I made it!

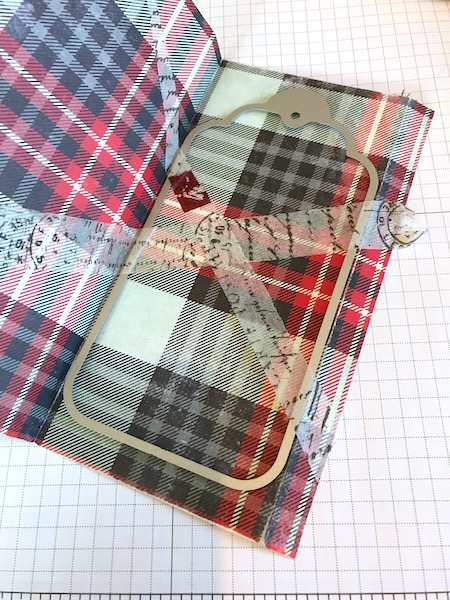
Start by cutting a piece of cardstock measuring 8" wide by 7" high. This pattern from Tim Holtz is perfect because the front and back coordinate. Score as shown above at 1/2", 3 3/4", 4 1/4", and 7 1/2". Fold on all creases. (Ignore the fact that this also shows the window cut and the snow added - I thought I'd taken a pic of it before this was done, but I guess I didn't!)

 
Next, with the paper flipped to what will be the outside of the card, position the tag die with the cutting edge down on the right side of the paper and secure with tape. Unless you have a wide die cut machine, you'll have to fold the left side over the top, sandwiching the die between, to get it through your machine. This might made a slight impression on the left side of the paper, but it won't be noticeable at all.

Cut three pieces of white cardstock using the wavy die from Karen's Nature Edges set and trim to fit. Cover with glue and sprinkle glitter over. Let dry completely. Adhere the bottom piece to the back of the card, then add the next two layers using thin foam dots. Cut snowflakes from glitter cardstock and adhere with foam dots.

Apply a length of scor-tape to the 1/2" edge and adhere to the other edge, creating a box. Cut trees using the large tree die from Karen's Winter Charms set, cut off the loop at top, and adhere to card. Finally, stamp the deer from Tim Holtz's Styled Woodlands set on white cardstock with grey ink, trim closely, and adhere to card. Add embellishments as shown.

Here is the finished card, all ready for mailing! If you add any dimensional embellishments, you might have to pay more postage. And I always add a piece of scrap cardstock over anything like brads so that they don't poke through the envelope.

You can find the products I used at my favorite stores via the links below.

Happy Holidays to you all and thank you for all of your comments and shares over the past year. Hope you all have a wonderful holiday season!

Thursday, December 21, 2017

Merry Christmas Faux Wood Tag

Hi everyone! I hope you are all well and not too overwhelmed by the holidays. For once, I feel like I'm not running behind with a million things left to do - very rare for me!

A couple weeks ago I was browsing through the Christmas decor at JoAnn's and spotted a cute little wood sign and immediately thought, 'I'll be I could make that out of chipboard!' I came home and pulled out some of my favorite dies from Karen Burniston and got to work. I have a quick tutorial below if you'd like to try it yourself.

Begin by cutting two tags from lightweight chipboard using the large tag die from Karen's Tag Book Pop Up set. I had some dividers from a liquor store box I grabbed (I can't resist those boxes when they set them out - weird, I know!) that ended up being the perfect weight. Paint them both white and cut one into slats as shown. Cut sentiment and cardinals from red Kraft Core'dinations paper. Cut leaves from green Kraft Core'dinations.

Adhere the slats on top of the other painted tag, starting with the center slat and leaving just a bit of space in between (the left and right edges will overhang just a bit). Use sandpaper to rough up the edges and give it a worn appearance.

Adhere your sentiment using Karen's fine tip bottle glue. Use a circle die and pencil to lightly trace a circle to use as a guideline for your wreath. Using the same glue, begin adhering your branches as shown, trimming and layering until your wreath is complete.

Color some of Tim Holtz's Beaded Berries with red alcohol ink and tuck into the wreath. Finally, adhere tiny cardinals to wreath and tie with a length of twill ribbon.

I hope you enjoyed this quick holiday project! I love the look of the faux wood slats and will definitely be using this idea on future projects. The supplies I used can be found at my favorite stores via the links below.


Have a great week!

Friday, December 8, 2017

Teacup Christmas Ornament

Hi everyone! Hope your week is going well! I'm finally getting into the Christmas spirit and have a fun little project to share with you.

Each year, my group of friends has an ornament swap. It's always so much fun to see what everyone comes up with - and it's always fun to dream up something new. This year I decided to create a little wintry diorama using Brenda Walton's Teacup die from Sizzix.

I used paper from Tim Holtz, and adhered it to a light blue cardstock - the pattern on the other side of the paper was too bold for the inside of the cup, plus the extra paper made it quite sturdy. After I assembled the cup, I stamped a winter cabin image on a circle of the same blue cardstock and used hot glue to adhere it to the bottom of the cup. This adds a nice backdrop so your little scene really pops. The seam is hidden with lots of snowy glitter.

After that, it was just a matter of adding lots of hot glue and little bits and pieces of Tim's Christmas embellishments. To finish the cup, I added tinsel twine and a bow at the top. I was really surprised at how quickly these came together. Once you get the hang of one, the rest are a snap!


Sizzix is having another huge sale. Sadly, the Teacup isn't included, but you do get free shipping with orders of $25 or more and there are lots of other dies by Brenda, Tim, and Eileen (all my faves!) that are hugely discounted.

The other items I used can be found at Simon Says Stamp and Amazon via the links below.


Thanks so much for stopping by today - have a great weekend!

Tuesday, December 5, 2017

Karen Burniston Designer Challenge - Trees, Please!


Hi all! It's time again for Karen Burniston's Designer Challenge. This month our theme is Trees, Please! I decided to create a card using Karen's Christmas Tree Pop-Up die, since I haven't had a chance to use it yet. While I was trying to decide exactly what to make, Karen suggested I try a gate fold card with two trees. I immediately thought of this card from a couple years ago and I was off and running!

The base of the card was created by scoring a 6" x 12" piece of kraft cardstock 3" from each edge. I also added a 4" flap at the top that's attached by a tab across the back. The closure was made from one of Tim Holtz's adorable log slices and a length of elastic cord.

Remove the elastic cord and the top panel pops up. Ooooh, a pretty winter cabin! But what's under those side panels?

You open them slowly...is that...are those...trees?!?

Why, yes...they are! And a little bunting that unfurls as the trees are lifted. How amazing is that tree die?!

A few details about the construction: the patterned paper is from a pad I found at Hobby Lobby. I'm obsessed with it and it's what pretty much inspired the whole card. The little cabin was created by cutting down Karen's House die and adding snow and a little wreath. The bunting is from the Tag Book set and the labels are from the Katherine Label Pop-Up set. The greeting was cut into the label using dies from the Holiday Word Set. Finally, the snow was cut with the wavy edge from the Nature Edges set.

Whew! I told myself I wasn't going to go overboard with this challenge, but I couldn't help myself. Even thought I used a lot of products, you could easily replicate this with just the tree die, substituting dies you already have for the other elements.

The supplies I used can be found at KB Riley and Simon Says Stamp via the links below.

Thanks so much for stopping by today! Make sure you check out Karen's blog tomorrow for a gorgeous card tutorial - you're going to love it!