Showing posts with label Simon Say Stamp and Show. Show all posts

Thursday, February 23, 2012

Simon Says Stamp...Paris, Plus a Honey of a Tutorial!

This week, the Simon Says Stamp challenge gave us our choice of Paris, London, or New York as our theme. I chose Paris, because I really wanted to use this balloon from Artistic Outpost's Paris Exposition stamp set. How adorable is it all honeycombed up?! It was definitely a bit of a challenge since it was so small, but it was not as hard as you might think.

I can't thank you guys enough for all the wonderful comments on my 12 Tags challenge tag! Without further ado, here is the tutorial you all asked for:

Super Simple Honeycomb

Supplies: StazOn or other permanent ink, glue stick, inking tool, hot air balloon stamp from Stampers Anonymous, Distress ink, tissue paper, white cardstock.

Step one: Using StazOn, stamp balloon portion of hot air balloon stamp on tissue paper 7-9 times (the more pieces you use the smaller your honeycomb openings will be. I used 7 for this example). Ink well with Distress ink.

Step 2: Cut out balloon portion of stamped image, trimming closely. I love how they look like petals! Idea for later, perhaps? Hmmmm....

Step 3: Fold each balloon in half. Even though this stamp isn't perfectly symmetrical, it's close enough. Notice that, since you used a nice, juicy StazOn pad and lots of Distress ink, the pattern and color show on both sides!

Step 4: Note - this is going to look tricky, but it's really easy! Take a folded balloon and, using your glue stick (the drier the adhesive, the better, you don't want it soaking thru!), run a line of glue down the folded edge. Add another little horizontal strip near the top, and one near the bottom. Stack another folded balloon on top and press to adhere.

Step 5: Open the folded balloon and add a small horizontal line of glue in the center. Refold and make sure it's adhered. Repeat this process until you've used all of your folded balloons. Each glued piece should alternate - one glued at the top and bottom, the next glued in the middle, and so on.

Step 6: When you're done stacking and gluing, it should look something like this. You can check your glue points along the way to make sure it's all opening up correctly.

Step 7: Stamp the balloon image on white cardstock, color with Distress ink, and cut out. This will be your base.

Step 7: Cover entire cardstock balloon with glue.

Step 8: Carefully align the folded, stacked tissue balloons on top of the cardstock balloon, the cut edge should be on the outside, the fold should be in the center. It doesn't matter which side you lay down first. Press to adhere.

Step 9: Carefully open up your tissue paper and press the other side down. You can use a craft stick or something similar to reach in and smooth it down, if necessary.

That's it! I hope this was somewhat easy to follow. It's so much easier to show than to tell! Feel free to email me with any questions, or leave one in the comments.

Here is another peek of my original tag using this technique. I think I glued at slightly different points, but it still works! As long as you alternate your glue points, you will get the honeycomb effect.

Here is the technique done on a much smaller scale! Isn't it adorable? This time I used a liquid glue and did not like it one bit. It doesn't take much moisture to get tissue paper saturated - definitely go with a glue stick for this! Just like my original tag, I stamped the rest of the image on a piece of scrap clear packaging and fit the two pieces together. This time, I used my heat gun to slightly soften the banners and then curled them while they were warm. The banner at the top was cut from white paper with Sizzix' Tattered Banners die, and stamped with another image from AO's Paris Exposition. So pretty!

I love using heat embossing on pieces like this, but don't want a shiny finish on something that looks so vintage. To tone it down, I lightly sanded the embossing after it cooled with my Idea-ology Sanding Grip.

After I made this, I wasn't sure what it was, exactly. Should it be a card? A hanging? I decided to add an easel to the back that was cut from chipboard using the Sizzix Small Easel die and make it a stand-alone art piece. I just trimmed a little off the top and it was a perfect fit.

The frame for my piece was created using the large Movers and Shapers Cabinet Card die, and the small Mini Cabinet card die. After it was cut from chipboard, I painted it with a Pitch Black Dabber and then sanded it when it was dry.

So sorry this has turned into a book, lol! I hope some of you decide to try this technique. If you need any of the materials I used, they can be found at Inspiration Emporium via the links below. If you're looking to save a little $$$, use my coupon code - stamptramp - to save 10% off your order!

Supplies


Thursday, February 16, 2012

12 Tags of 2012 - February

When Tim Holtz announced that he wasn't going to continue with the 12 Tags of Christmas anymore, my heart broke just a bit. Even though I know it had to be so much work for him and I know that it was difficult for people to follow along at such a busy time of year, I loved that tradition and will truly miss it. However, I am very excited to be starting a new tradition! I am thrilled that we'll get a little 12 Tags fix each month - why not spread it around a bit?? So, I dried my tears and got to work....

I think the honeycomb paper that Tim used is incredible, but I didn't have any. In addition to that, I have used that cupid set so much, I thought you all might be just a little sick of seeing it on my blog! PLUS, I had just received a lovely package from Inspiration Emporium with the new Remnants stamps from Stampers Anonymous. What's a girl to do? I decided to try not just making my own honeycomb, but making it out of the balloon portion of the stamp. And it worked!! The basket portion of the image was stamped on a piece of packaging with Staz-on.

Here is another angle where you can see how much the balloon pops out from the tag. So cool! I took a couple pics while I was making it, so if anyone wants a little tute, please let me know in the comments. :-)

My background was also an experiment. I have the Valentine's embossing folder, but I don't have the matching stamp. To get the same look, I cut my tag from an old file folder using the Tag and Bookplates die from Sizzix, and embossed it. Then, I took a Snow Cap Paint Dabber and swiped across the raised portion. I wanted a more muted color so the balloon would stand out, so I inked it with Weathered Wood, Frayed Burlap, and a little Black Soot Distress Ink. Next, I wiped off the raised portion with a baby wipe - perfect resist! I love the weathered look of this!

Finally, I added a little sparkle by stamping the air mail label and covering the edges with Fired Brick Distress Stickles (trust me, it's really sparkly - I hate photographing glitter!). The label is attached to the tag with an Idea-ology Mini Paper Clip. Ever since Tim showed us how to use metal foil with the Vintage Lace die, I have been addicted to it. After I cut my lace and punched out the bits, I covered it with Pitch Black Dabber Paint, let it dry, and then buffed it off with a tissue. Oh...it looks so dang cool!!

Everything I used to create my tag can be found at Inspiration Emporium via the links below. Make sure you use my coupon code - stamptramp - to save 10% off your entire order!

UPDATE! You can find the full tutorial here.

Supplies:

Sizzix Tag and Bookplates Die
Sizzix Vintage Lace Die
Sizzix Valentine Background Texture Fade
Stampers Anonymous Remnants Stamp Set
Adirondack Paint Dabbers - Snow Cap, Pitch Black
Ranger Distress Ink - Weathered Wood, Frayed Burlap, Black Soot
Fired Brick Distress Stickles
Idea-ology Mini Paper Clip

I'm also linking to this week's Simon Says Stamp and Show - Anything Goes challenge. Who can resist such an easy theme? ;-) Thanks so much for stopping by!!

Monday, January 23, 2012

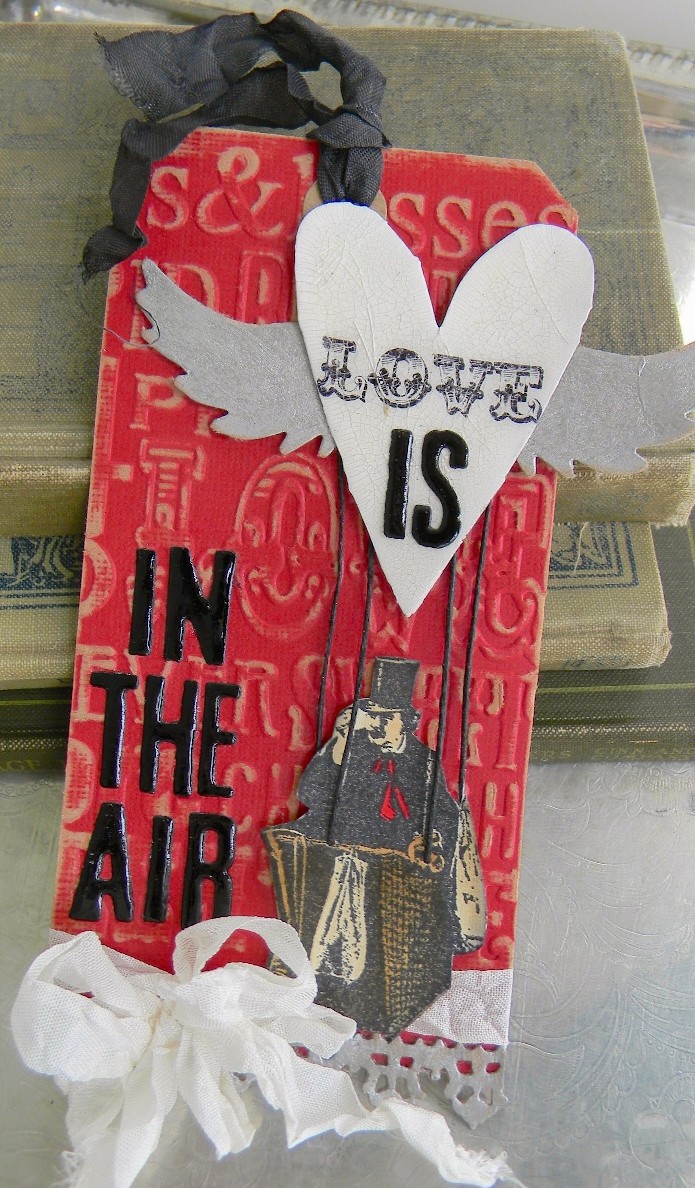
Love is in the Air

This week's theme over at the Simon Says Stamp and Show is such a fun one! It's all about song titles, so there are some really fun submissions. I chose 'Love is in the Air', a disco song from 1978 (you should watch it...you'll have flashbacks if you're around my age). The only problem is that it's now firmly stuck in my brain!

I have been dying to use this hot air balloon man from Artistic Outpost's French Flight stamp set like this since I first got it. Originally, I thought I'd use a gear for the balloon, but I love the heart! The tag was cut from red Kraft Core'dinations using Tim's Tag and Bookplates die. It was embossed with Tim's new Valentine's Texture Fade and then sanded with an idea-ology Sanding Grip.


The heart shape for the balloon was cut from chipboard using the new Sizzix Love Struck die. I used my Faux Crazed Porcelain technique on it - love how it looks! The wings on the heart were cut from chipboard with the Sizzix Heart Wings die, and painted with a Silver Dabber. The stamp is from Tim's Stuff to Say stamp set.

BTW, you may have seen that Wendy Vecchi has a new technique with the same name, but it's totally different. I can't wait to try it!) If you haven't tried mine yet, you can view my tutorial (and a pretty dorky video), on the Splitcoast Stampers site.

I love these letters so much! They were cut from black cardstock using the Sizzix Chip Block die. To really make them pop, I coated them with Glossy Accents. Such an easy way to add dimension to your die cuts! The bottom of my tag is finished with seam binding and a bit of lace border that was cut using the Sizzix Vintage Lace die and painted with a Silver Dabber.

All of the items I used can be purchased from Inspiration Emporium. When you use my coupon code - stamptramp - you'll save 10% off your order! The products are listed below, clicking on them will take you to the store - have fun!

Sizzix Love Struck Die
Sizzix Chip Block Die
Sizzix Vintage Lace Die
Sizzix Tag and Bookplates Die
Sizzix Heart Wings Die
Kraft Core'dinations
Adirondack Silver Dabber
Idea-ology Sandiing Grip
Ranger Glossy Accents

Tuesday, January 17, 2012

Love Struck!

This past week I've been consumed with working on my Idea-ology CHA projects (you guys are gonna go crazy for the new stuff!) and haven't had a lot of extra time to make anything to share on my blog. Last night I decided to take a little time and create something for a couple different challenges: Simon Says Stamp and Show - Anything But a Card, and Hels' Sunday Stamper - Gold.

I just bought the new Sizzix/Tim Holtz Valentine's dies this past weekend and have been using them like crazy - I think they are so cute! For this project, I started by creating a little hanging treat box from the Technique Junkie 3D and Fun Folds CD. By the way, thanks to those of you who've purchased it! If you've never heard of it, the 3D and Fun Folds CD is produced by the Technique Junkie newsletter - some of you have thought it's my creation, but I can't claim credit. I did design work for it and Pat Huntoon was gracious enough to let me offer it to my readers (I get a little commission whenever you buy it through my link!). You can read more about it here, but please purchase through my link below so I get credit! :-)

The box was created from kraft cardstock and then painted with a Snow Cap Dabber. After it dried, I embossed the top portion with one of the border dies from the new Sizzix Valentine Texture Fades collection. In order to flip the border and create a mirror image, I slit the Texture Fade on the fold, leaving just a bit to hold it together. I don't know if I would recommend that to anyone, but like Tim says, you can always tape it back together! The border along the top is made from Kraft Core'dinations paper that was cut with the Sizzix Vintage Lace die, sanded, and glittered.

Isn't this just gorgeous??? I used the Mini Lovestruck die to cut my little cupid, then covered him with gold glitter. The heart was cut with the same die, then painted with a Snow Cap Dabber and sanded. The xoxo (from Tim's Stuff to Say set) was stamped with black ink. Underneath my cupid, I have a rosette that was cut from Kraft Core'dinations and glittered. To make it even prettier, I added a ruffle using Tim's District Market tissue paper. In the corner I added a banner cut from kraft paper using the Tattered Banners die. The sentiment is from Tim's Stuff to Say stamp set.

Another new die for me is the Mini Flourish - so cute!! I cut my flourishes from light chipboard and painted them with a Pitch Black Dabber, then sanded lightly. The little penguin peeking out is from the Valentine's paper in the Idea-ology Seasonal Paper Stash. Just behind the flourish, you can see a little strip of rosettes from the Idea-ology Lavish Trimmings set.

All of the supplies I used can be found at Inspiration Emporium. Don't forget, if you use my coupon code - stamptramp - you will save 10% off your order!! They have great prices on shipping too, so be sure to check them out through the links below.

Supplies:
Sizzix Mini Love Struck Die
Sizzix Mini Flourish Die
Sizzix Paper Rosette Die
Sizzix Borders Texture Fade
Sizzix Tattered Banners Die
Sizzix Vintage Lace Die
Kraft Core'dinations Paper
Idea-ology Seasonal Paper Stash
Idea-ology Lavish Trimmings
Stampers Anonymous Stuff to Say Rubber Stamps
District Market Tissue Paper - Terminology
Ranger Adirondack Dabbers - Snow Cap and Pitch Black
Idea-ology Sanding Grip

Finally, here is the link if you're interested in purchasing the 3D and Fun Folds CD. If you love paper crafting, this is the CD for you!


Oh, one more thing! I know this is getting a little long, but I wanted to show you my Movers and Shapers storage. Awhile ago, there was a discussion on the All Things Tim Yahoo group about ways to store these little dies. Someone suggested using a silver platter (remember when the Brady kids entered that contest as the Silver Platters? I still love that song!). Anyway....I started hunting around thrift stores and estate sales and found some cheap! I think this one only cost $2. You definitely need to have a magnet with you - I had some at home that I thought would work and they didn't. I love storing them this way. When I get time, I'm going to drill holes in the corners and mount it to the wall by my Vagabond.

Thanks so much for visiting - have a great week!!

Friday, January 6, 2012

My Heart's All Aflutter

Ok, so....I went out to the studio, fully intending on working on some CHA stuff. But. Those wicked Inspiration Emporium people had sent me a box full of temptation. What was I to do??? I have been in love with the Distress Doily die since I first saw it. While I was putting it carefully on the shelf, it called out to me. It said, "Hey, Lady! Make something with me...now!" I'm not one to argue with inanimate objects, so I agreed.

First, I folded some plain white, text weight paper in half and then cut it with the die. After I'd done about 10, I sprayed them with a shimmer mist solution I made by combining Cranberry Adirondack Colorwash, Worn Lipstick Distress Reinker, Pearl Perfect Pearls, and water. I used my heat gun to dry them and then added little hearts inside each fold. The hearts were cut from vintage French book pages using the Mini Hearts Movers and Shapers die from Sizzix..


When everything was dry, I glued the 'backs' of each doily to the next one, creating a....hmmm...what to call it? I created a pretty thing. A little ornament you can use to decorate for Valentine's Day. To hang my paper ornament, I glued a loop of Idea-ology ribbon in the center, before the doilies were all glued together. If I'd had any Idea-ology Baubles, I would have added one to the bottom - I think that would really finish it off!

The supplies I used are listed below and can be purchased at Inspiration Emporium. In celebration of Jay's (one of the owners) and Tim's (Holtz) birthdays, they are running a Birthday Special! When you use the coupon code, birthdayboyz, you'll receive 17% off your order! Happy Birthday to all of us!

Supplies:
Sizzix Distress Doily Die
Sizzix Mini Hearts Set
Idea-ology Lavish Trimmings
Adirondack Colorwash - Cranberry
Ranger Distress Reinker - Worn Lipstick
Ranger Perfect Pearls - Perfect Pearl

I'm linking up with this week's Simon Says Show Something Old (vintage hearts)...Something New (my new die!). Make sure you check out all the wonderful submissions!

Thursday, December 22, 2011

Tim's Tags, Day 11 & 12 - I'm Done (Finally)!

After getting back into the groove with my little Tim Holtz rosette tree yesterday, I decided I would buckle down and finish the last two tag from his 12 Tags of Christmas. I didn't think I was going to like this one, but I am in love!

My background started with a script stamp from Artistic Outpost's new French Flight stamp set. Instead of washing over it with Picket Fence Distress stain, I used my Snow Cap Paint Dabber to tone it down. I don't have any of Tim's Tissue, so I made do. Instead of music, I decided to stamp snowflakes from AO's Snowy Woods collection. I used Brushed Pewter Distress Stickles for my dot outline. It seems like every year I find an excuse to use this gorgeous angel rubber stamp from Oxford Impressions. So hard to believe it's a stamp! I lightly colored her with Distress inks so she stood out a bit. My tissue flower was also hand stamped - this time using a music rubber stamp from Artistic Outpost's Ephemeral Backgrounds collection.

I didn't have the Adornments snowflake Tim used, but I DID have the Sizzix Mini Snowflakes dies! I had so much fun cutting the metal-covered paper when I made the lace trim and letters, I thought I would try it with the snowflakes and see what happened. Well...magic happened!

After I cut them, I was trying to figure out how to make them a bit bulkier - more like a charm. I stacked one on top of the other (they're slightly different) and a little light bulb went off - they fit together so well and looked like a really cool charm! After I stacked and glued them, I noticed that the die had created a little raised edge with a depression in the center. Hmmmm....I thought...what if I filled that with Rock Candy Distress Crackle medium (thanks to Tammy Tutterow for planting that little seed in my brain!)? As you can see, it is insanely cool looking! Love my icy little snowflake! It's attached to the tag with an Idea-ology Jump Ring and Charm Clip.

Ok, I will just say that I didn't really want to post this! I am so not a retro kind of girl. I love when other people do it, it's just not my thing. I DO love these stamps from Artistic Outpost's Frosty and Friends stamp set though, and thought they were perfect for this tag.

I didn't have shrink plastic, so I did a different technique for my holly. I cut thin metal using the Sizzix Mini Holly die. I used Adirondack Alcohol ink and dropped it directly onto the metal. When it dried, I inked my leaves with Distress Embossing Ink and then embossed them using Ranger's Ultra Thick Embossing Enamel (UTEE). I love the look of these! Sorry my pic isn't the greatest, but you get the idea. :-) I also inked my jingle bells with Adirondack Alcohol ink - they make perfect holly berries!

In case you didn't know, you still have time to enter Inspiration Emporium's 12 Tags giveaway! Check out this post on the Inspiration Journal blog. We'd love to have you play along! If you need any of the supplies I used, they are listed below and can be found at Inspiration Emporium. Be sure and use my discount code - stamptramp - to save yourself 10%!

Sizzix Mini Holly Die
Sizzix Artful Dwellings Die
Sizzix Mini Snowflake Die
Sizzix Vintage Market Alpha Die
Sizzix Vintage Lace Die
Sizzix Festive Greenery Die
Sizzix Tag and Bookplates Die
Adirondack Paint Dabber - Snow Cap
Ranger Distress Stickles - Brushed Pewter & Rock Candy
Ranger Distress Crackle Paint - Rock Candy
Ranger Adirondack Alcohol Ink - Bottle and Red Pepper
Ranger Archival Ink - Jet Black (the ONLY ink I use for photo image rubber stamps!)
Ranger Distress Ink - Winter Limited Edition Collection
Idea-ology Jump Ring & Charm Clip

I'm linking up with Simon Says Stamp and Show a Tim Holtz Tag and Hels' Sunday Stamper - Santa Claus. Take care, everyone!