Hi all! I'm just popping (!) in to share an idea for a quick thank you card using Karen Burniston's Fancy Label Accordion die. If you've followed me for awhile, you might remember a post from a couple years ago where I used napkins as background paper for cards. This weekend, I was trying to think up a quick thank you card that would be pretty, but be fairly quick and easy to make. I spotted my stack of napkins and my problem was solved!
I used Karen's Fancy Flourish Frames to decorate the front. The sentiment was cut from green cardstock using dies from Word Sets 1 and 4. I highlighted the words with a white gel pen and glitter, but it's a bit hard to see in the photo.
To give the card a bit more interest, I adhered another napkin to cardstock and cut out a few of the elements, like the bird and flowers, then adhered them to the card with foam to give it a 3D appearance. So pretty!
You can find the supplies I used via the links below.
Hi everyone! I mentioned in my last post that, while I was working on the butterfly pop-up card, I had the idea to make a steampunk version...and here it is! My dad's birthday was last month but I was out of town and didn't have a chance to make a card for him. I thought the 'time flies' theme was perfect for a late birthday card!
Karen Burniston's Spinner Square Pop Up die is so much fun! I combined it with another one of her die sets - the Snowman Twist Circle - to create a spinning, moving card that is a delight to open. The base of the card is gray cardstock. On the front I added a silver painted and embossed panel and added a window. Surrounding the window is a gold (heat) embossed frame that I made by nesting the two largest circles together. The 76 was cut from foil-covered cardstock and colored with alcohol inks.
I thought that this sitting man from Tim Holtz's Paper Dolls was perfect sitting on/in the clock. When the card is opened, the gears spin out from behind the clock. It's so cool!
I used various gears from one of Karen's discontinued collections (Clock and Gears) and some of Tim Holtz's gear dies. The were all cut from heavy cardstock and given a metal look using my Faux Tarnished Silver technique - I haven't used that in ages!
Here's a closer look at the mechanism and gears. I used heavy clear plastic (cut from saved packaging) to create an arm that the gears could attach to. I had a hard time getting them to stay using any type of glue and ended up stapling them with Tim's Tiny Attacher. I decided it adds to the industrial look. ;-) The sentiment and words were computer generated and printed on kraft cardstock.
Here's quick video showing the mechanism operating. There are really so many possibilities with this die!!
Speaking of amazing dies, Karen Burniston/KB Riley are celebrating their new Facebook Group - Karen Burniston Pop-Up Peeps - with a sale! Through tomorrow, April 25th at Midnight CDT, they are offering 18% off of your order of $20 or more when you use the code 18OFF in the coupon box when you check out. This is a great time to stock up on some of the best dies the craft world has to offer!
You can find Karen's dies and the other supplies I used via the links below.
Below is the assembly video for the Spinner Square Pop-Up die. Once you figure out the mechanism, it's a breeze!
Thanks so much for stopping by today! If you're on Facebook, be sure and join the group. It's a fantastic, friendly group and people are sharing the most amazing cards!
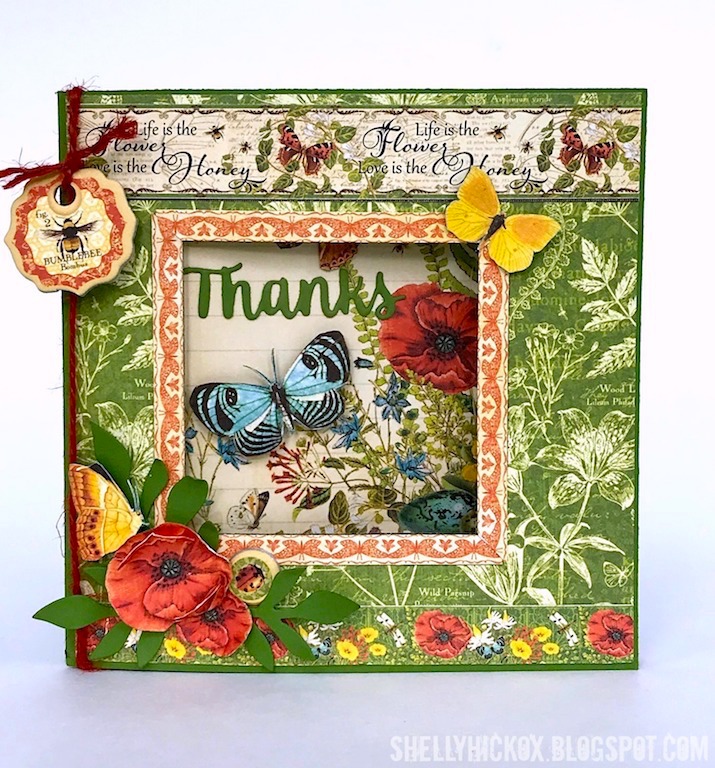
Hi all! It's time again for Karen Burniston's Designer Challenge. This month our theme is 'Hip to be Square'. I thought it was the perfect time to use one of my favorite dies - Karen's Spinner Square Pop-Up - and got to work making a pretty botanical thank you card.
The papers are all from Graphic 45's Nature Sketchbook (retired, but you might be able to find it on eBay or Etsy). This is one of my all-time favorite collections and it works so well for this card!
As the card is opened, the two butterflies on the right 'fly' out from behind the square panel. Magic! I love thinking of different things that could be animated using this die. As I'm typing and thinking, I've already decided I need to do a steampunk version with gears - how cool would that be?!
To animate the butterflies, I used the rectangle arm die from the set to cut a piece of transparency so that the mechanism would disappear and the butterflies would look like they were flying. I adhered the larger butterfly to the arm, making sure that it would be hidden when the card was closed, and then attached the smaller butterfly to it with a foam dot.
This series of photos shows the various positions of the butterflies as the card is opened. I love the magic of them floating out from behind the square panel!
Here's a quick video to show the animation. It's a little dark, but you can get the general idea of how the card works!
The supplies I used can be purchased via the links below.
Thanks so much for stopping by today! Be sure and check out Karen's blog on Wednesday to see her latest tutorial and lots of inspiration from the team!