Tuesday, February 11, 2014

Designer Challenge - With Love

Hi all! I'm so excited to share this card with you! I created it for Karen Burniston's monthly challenge using her new Pop it Ups dies. Karen has released a brand new line with Elizabeth Crafts that is going to totally change the way you look at pop-up cards. You absolutely must check out her post on Wednesday on the new EC blog to see what all the other designers have come up with.

After much debate over which of the fantastic dies I should use, I picked the Heart Pivot. I love that the pop-up element shows up on the outside of the card, and on the inside. It makes decorating a snap!

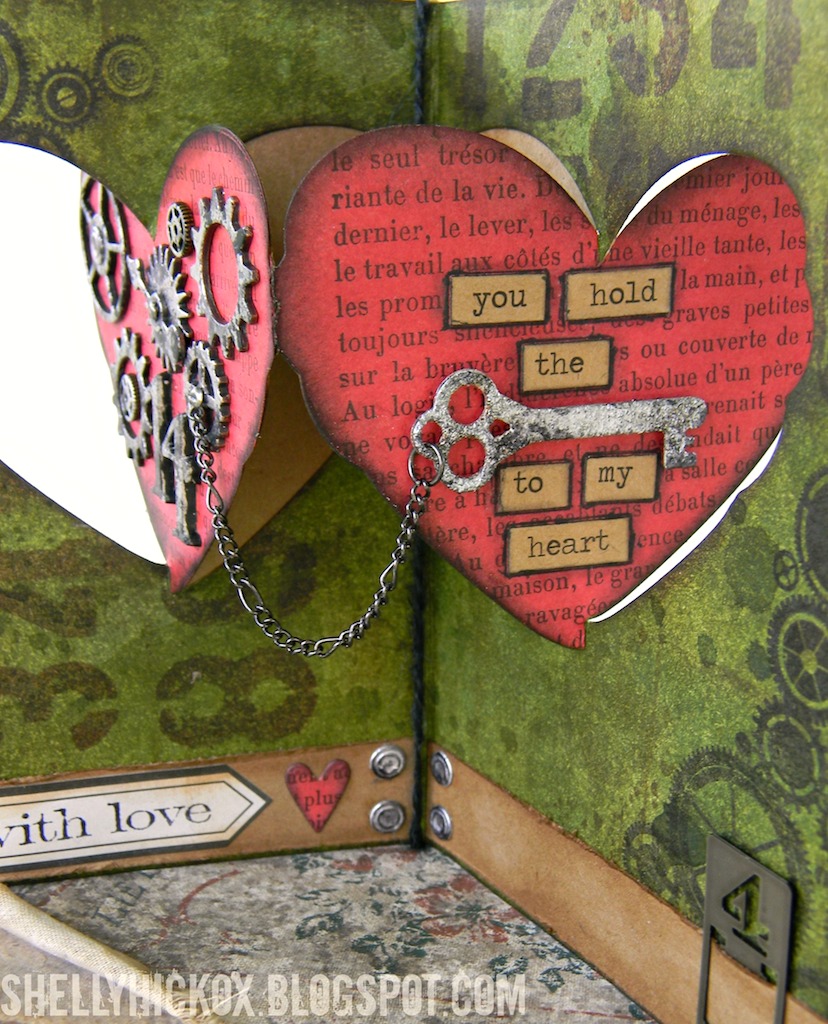
Since this is a card for my husband, I wanted it to be Valentine-ish, yet have a manly feel. Gears always say 'man' to me, so that was the basis for my design. Wendy Vecchi's Red Geranium Archival ink from Ranger might just be the perfect red I've been looking for!

This key is one of the dies included in the Heart Pivot die set. I love how real it looks! Idea-ology Chit Chat Stickers spell out my sentiment.

For the longest time, I've wanted a die that would cut little circles that would give the look of brads. I was tickled when I realized that the punched out holes from Karen's Border die looked like perfect little nail heads. You can bet I'll be making up a  big pile of these to use in future projects!

Since some of you might not be familiar with these new dies, I thought I'd do a quick little tutorial to show how I put this card together. Hope you enjoy it! 

I started with an A2 sized card cut from manila cardstock. After inking it with various colors of Distress inks, I scored it down the center. The scoring is important, since that's where you'll line your die up.

Next, I decided where I wanted my pop-up to be and aligned the little nubs with the center score line. Using the Sizzix Magnetic Platform ensures that your die will stay right where you want it. One of the most exciting things about these new dies is that you can make your card any shape, any size, and you can line your up your pop-up element anywhere along the score line. Very cool!

Because I wanted the entire heart portion covered with a different paper, I used the Pop it Ups die again and cut some French Text. A few snips and some of Wendy Vecchi's Red Geranium Archival ink and they are ready to be adhered to the card.

I wanted to give my gears and numbers a uniform color/look, so I used Silver and Pitch Black alcohol inks to color them. I also cut a key from foil-covered cardstock using one of the accessory dies that's included in the Heart Pivot die set.

After adhering the gears to the left heart, I added idea-ology Chit Chat stickers to the right side. The key is raised up a bit using foam dots and a length of Lace Chain is attached and then draped over and attached to the other heart with a Tiny Fastener. It's hard to see in this pic, but I used Artistic Outpost's Industrial Backgrounds and Stampers Anonymous' Purveyor images for the background of the card.

The faux brads were made by covering thin chipboard with foil tape and then cutting with this border die. You'll end up with two different sizes. After I cut them, I inked them with alcohol inks, just like I did with the gears.

To finish the inside of the card, I added strips of kraft paper, a tiny heart (this die is included in the Oval Accordion die set), and my cool faux brads.

You know how much I love my Vine videos to show the motion of these cards. :)

Very exciting news - Inspiration Emporium is carrying Karen's full line of dies! Of course, you can use my coupon code - stamptramp - to save 10% off of the dies, plus all the other supplies I used to make my card.


Speaking of Inspiration Emporium, we also have a brand new challenge going on right now. This month, we want you to Show it with Words. You can find all the info in THIS post. Hope you can join us!

Tuesday, February 4, 2014

French Peat Pot Favors + a Party!

Yesterday, I shared a pop-up card that I made when my friends came over for a party. Today, I'm sharing some fun pics from the party, plus a quick little tute on how I made these cute peat pot favors. I filled mine with eggs from my chickens, but you could fill them with candy, an herb plant (I almost did that), or any other small items. The best thing is they take about 5 minutes to make - I love those quick and easy projects!

Since January is a bit gloomy, I decided to use lots of bright and cheery things to make it feel more like spring. I collect vintage tablecloths, and this one was just perfect for the look I wanted.

This cake. OMG. I can't tell you how proud I am of it! Now that my kids are grown and gone, I don't make many birthday cakes. I really wanted to do something special, so I looked on Pinterest to see what I could find. What I found is that rosette cakes are hot hot hot. I'd never attempted it, but I found lots of different tutorials that made it very easy! My favorite part, though, is that little vintage chalkware bird candle holder. I found a set of these, unused, at an antique store and have been dying for a reason to get them out. So cute!

I love these girls! They are three of the most creative, fun, and generous people I know.

Yum! I'd never made cheese souffles before, but I found this recipe in the latest Martha Stewart Living and thought I'd give it a try. SO easy! Honestly, I was so surprised at how little effort it took. I'm currently obsessed with arugula, so I did a salad of that with strawberries and toasted walnuts with a balsamic vinaigrette dressing. I found the cute ramekins at Target last year.

Be still my heart. Inside that fabulous crusting cream cheese icing was a delicious red velvet cake. Just looking at this makes me hungry. Good thing I don't make cakes very often!

Ok, are you ready for the fastest tutorial in the world? Here you go!
  • Begin by painting a peat pot (I got mine from Amazon) with white paint, inside and out. Make sure you leave it looking a bit patchy to give it a whitewashed, vintage feel. Set aside to dry. 
  • Next, stamp the Marche aux Fleurs stamp from Artistic Outpost onto white tissue paper, using black StazOn ink. Tear away the excess paper, getting as close to the image as possible.
  • Apply Matte Multi Medium to the back of the stamped image and carefully place it onto the pot, making sure it's smooth with no wrinkles. Very gently smooth over the image, pressing out any excess glue. You can dip your finger in a bit more of the Medium to make it easier. 
  • The more you press and smooth, the more texture the stamped image will take from the pot. If done correctly, the tissue will 'disappear' and you won't see any of the torn edges.
  • When completely dry, tie with a length of idea-ology Jute String.

I just have to share one last shot of my table. Hope you enjoyed the mini-tute and are inspired to make a few pots and throw a party!

Most of the supplies I used can be found at Inspiration Emporium via the links below. Remember, you can use my coupon code - stamptramp - to save 10% on your order!


Monday, February 3, 2014

To My Valentine - Pop-Up Box Card

This past weekend, some of my best friends came to my house to celebrate two of their birthdays (look for a post about the party and a quick tute for a fun stamped favor this week). It was so much fun! We almost always try to do some kind of papercrafting project, and I was excited to show them how fun and easy the pop-up box card from Splitcoaststampers is to make. They all loved it and couldn't believe how quickly it goes together - which means you can get right to the fun of decorating it!

Since Valentine's Day is just a couple weeks away, we all decided on that theme. Of course, I had to use lots of Sizzix dies and some of my favorite stamps and papers from Tim Holtz. If you haven't had a chance to check out the tutorial for this cool card, make sure you do. It is so much fun! Here is a link to the steampunk birthday card I made using this tutorial. I tell you...addicting!

Nearly everything I used can be purchased from Inspiration Emporium via the links below (the tiny hearts are an older Sizzix die). Remember to use my coupon code - stamptramp - to save 10% on your order!