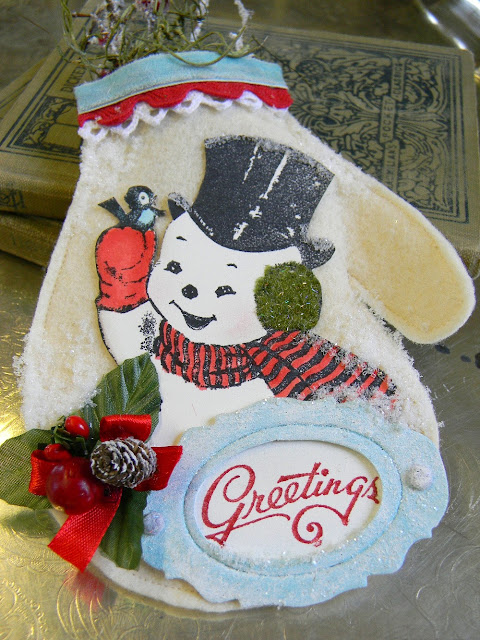
Today's Sunday Stampers theme is birds - I might be stretching it just a bit to include this, but there IS a bird on it! I got the idea for the mitten from one I saw on Pinterest that was done by Betsy Veldman. I loved this idea so much and thought the Frosty stamp from Artistic Outpost's Frosty and Friends collection would be perfect for it.
The mitten pattern came from MME Designs (thank you!). I traced it onto cream felt, cut two pieces and stitched them together.
Next, I stamped Frosty onto watercolor paper and colored him using Broken China and Barn Door and Distress ink and a water brush. I cut it out and inked the edges with Frayed Burlap Distress ink. He's adhered to the mitten with Elmer's Craft Glue.
The frame was cut from chipboard using Tim's Tag and Bookplates die. I used an Aqua Paint Dabber to paint it and then went over it with a Snow Cap Dabber to give it a frosty feel. When the paint dried, I covered the frame with a thick layer of Rock Candy Stickles. I also added bits of chunky glitter here and there.
You might notice his fluffy looking ear muff - it's Sparkly Fluff! I love the extra sparkle and dimension it gives the piece. Below you'll find a tutorial on how to tint white Fluff using Distress Stain. Now, you can match it to any project!
Supplies: Ranger Distress Stain in desired color(s), Sparkly Fluff - Sugar (white), craft stick, plastic palette or something similar (I like to reuse lids from plastic containers - they are perfect for corralling the fluff!).
Step 1: Begin by dispensing a small amount of stain onto your palette. You can mix several colors, if desired.
Step 2: Sprinkle a small amount of Sparkly Fluff over the stain.
Step 3: Using your craft stick, begin working the Sparkly Fluff into the Distress Stain. At this point you can add more stain and/or Fluff if needed. Your Fluff will look quite clumpy at this point. Just keep moving the Fluff around until it is completely colored, but not overly saturated. If you have too much Stain, add more Fluff.
Step 4: Let the Sparkly Fluff dry completely. I found the dashboard of a car sitting in the sun worked very well...just make sure you warn your husband so he doesn't freak out and throw that 'moldy stuff' away. ;-) When your Fluff is dry, break up the clumps by rubbing them with your fingers. You will be so surprised at how it 're-fluffs'! After you use it in your project, you can store the excess in a small baggie.
Thanks so much for stopping by - have a great week!


Love it! Great hint for coloring the fluff!
ReplyDeleteGreat tutorial! Thanks! =)
ReplyDeleteSuch a cute mitten! Thanks for the tip on coloring the fluff. I keep seeing so many ways to use these stains, it's great! Still need the snow cap!!
ReplyDeletePam
Absolutely adorable!
ReplyDeleteoh so cute... loving that bespoke mitten, so sweet! Thanks for joining in with the Sunday Stamper... oh and that sparkly fluff makes me want to sneeze but it sure looks good :O)) X
ReplyDeleteGreat tip on the fluff!
ReplyDeleteI love how you used the distress stains to color in the snowman! Great job!
Ahhhh.. So cute. Thanks for the tutorial on the fluff.. Looks like fun..
ReplyDeleteAbsolutely adorable!
ReplyDeleteHugs,
Dorly Weitzen, Israel
Sparkly Fluff is one of my new favorites....thanks so much for sharing how to make it even better. Who would have thought that would be possible. YOU! Thx.
ReplyDeleteVery cool effect! Your snowman is so cute!
ReplyDeleteteeth hurt from that much sugar....such a sweet design!!!
ReplyDeleteSweet project, Shelly! Very creative dying the sparkly fluff... we all know we just *had* to buy bottles of it during the 12 Tags - now we can color it!
ReplyDelete