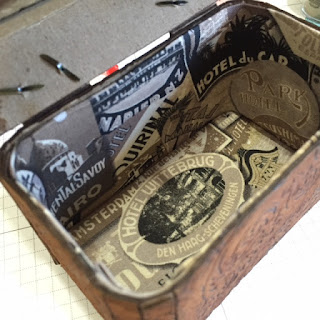
Of course, any vintage train case needs a pretty fabric lining. I used one of Tim Holtz's gorgeous travel patterned fabrics to completely line my mini case. A die cut piece of idea-ology Mirrored makes a perfect little mirror.
Here's a quick tutorial on how it all came together:
Begin by cutting two pieces of brown Paper Leather and two pieces of chipboard to approximately the size of the side panels of the case. Crumple the Paper Leather and adhere to the chipboard.
Next, die cut the panels using Eileen's Train Case die. Using Tim Holtz's Regal Flourishes Texture Fade and a black Ink Sheet, emboss the panels. The Ink Sheets transfer the embossing pattern to the Paper Leather - so cool!
Note: by adding the Paper Leather, it makes this sandwich a bit too large for the Vagabond. I played around with shims until I got it to fit, but I don't want to recommend that in case it stresses your machine. Instead, I recommend embossing the Leather Paper separately and then adhering it to the chipboard. You should still get the embossed leather effect without any chance of damaging your machine.
After all pieces have been embossed (I left the side panels of the lid plain to give some contrast), use Ranger Distress stain to color the Paper Leather. Die cut the handle from chipboard that's been covered with black Paper Leather and paint the edges with black paint. Die cut the hinges and closure from chipboard and emboss with gold embossing powder (not shown). Assemble the case completely.
Now we can line the case! Cut an extra case top/bottom from chipboard and trim slightly so that it fits inside the case. Cover with fabric.
Measure the inside of the bottom half of the case and cut a piece of fabric to fit, adding about 2" to allow for a hem and extra fabric for the bottom corners. Fold one edge and press to create a finished edge.
Add tape or glue around the top of the case and adhere finished edge of fabric. Adhere the fabric covered bottom piece, using a strong glue. Repeat the process for the top of the case.
Add a die cut piece of idea-ology Mirrored and you're done! I also used a Distress Marker to touch up any areas where the raw chipboard showed and inked the edges with brown distress ink to give it an aged appearance.
To finish off the top, I added a length of idea-ology Linen Ribbon, a key, and one of the new Cameo Frames. Pefect! The finished box measures just 4" H x 5" W, perfect for storing a few favorite embellishments, or as a very impressive gift card holder. Truly, the possibilities are endless with the cute little case!
The supplies I used are available from Sizzix, Simon Says Stamp, and Amazon via the links below.
Thanks so much for stopping by today! Be sure and check out Eileen's blog for more great ideas using Sizzix Paper Leather and Ink Sheets - they are both really cool products!


Holy cow I love this. Good tip on embossing the paper leather first and then adhering. Love the black inksheets on there- crazy good per usual!
ReplyDeleteThis is beautiful Shelly!
ReplyDeleteStunning! Looks like a real train case. Really beautiful!
ReplyDeleteSoooooooooooooo cool!!
ReplyDeleteWow, Shelly! This has to be one of my favorite pieces that you have done! Love every detail!
ReplyDeleteRidiculously brilliant Shelly!!! LOVE the use of the inksheets to create that tooled leather look x
ReplyDeleteSo cool Shelly! It does look like leather. The fabric lining takes it to a new level. Such a great piece.
ReplyDeleteReally amazing, such a creative use of these products!
ReplyDeleteI love this-too cool. I am definitely am going to get the Train case die. Have seen a few items to make with it but yours is by far the best. Love all your fantastic projects. >^..^<
ReplyDeleteStunning make Shelly, pinned for future reference xxx
ReplyDeleteThis is so fabulous Shelly! I love it.
ReplyDeleteI love the leather paper and ink sheets...so glad to see you all using them. You train case is fabulous!!! I love the look in and out!
ReplyDeleteShelly, your case is amazing, great tip about embossing first too!
ReplyDeleteI just found this post after looking at your dad's recent birthday card. This is the best train case I've seen. It looks like real leather and then having a real cloth lining just makes it even better. Your blog is a wealth of inspiration.
ReplyDelete