Hi everyone! I'm sure by now most of you have heard of
Tim Holtz' Tattered Florals challenge. I think this was one of the first Sizzix dies I bought and it's still one of my all-time favorites! I love that it can cut anything from tissue paper to Grungeboard to aluminum. With my daughter's upcoming wedding on my mind, I decided to make some delicate, feminine blossoms in her colors using Tim's Tissue Wrap and coffee filters. Since the die cuts a variety of flowers, it's fun to put together different sizes and styles.
I had a blast creating this little bird house for the flowers to climb. Would you believe it's nothing but paper and plastic? Add a little paint and no one would ever guess!
Aren't those flowers just
dreamy?! I love using coffee filters for my flowers because they look so delicate, but the paper is really strong and can stand up to misting and shaping without falling apart. Some of the flowers have Tissue Wrap centers with coffee filter flowers on the outside - I think those are my faves!
The inspiration for this little bird house was a grungy metal and glass
display piece/candle holder that I bought at Hobby Lobby last year. I
love the look of it and thought it would be fun to try to recreate -
with Sizzix dies, of course! I posted a quick (ish) tutorial below so you can make one of your own.
1. Die cut four Cameo Frames out of chipboard. Trim two of them as shown. Those will be the sides.
2. Cut four flourishes out of lightweight chipboard using the Festive Greenery strip die. Adhere to the frame as shown.
3. Paint the front and other pieces with Pitch Black and Silver Dabbers. Add a wash of Snow Cap and Terra Cotta, wiping off the excess, but leaving some in the cracks.
4. Cover the windows with clear plastic. I used Wendy Vecchi's Clear Modeling Film. You could also use leftover packaging. Cut three fleur de lis from chipboard using the Mini Fleur die. Paint using the same technique as the walls. Glue onto windows using Glossy Accents.
5. Die cut paper (from Idea-ology French Industrial) using the Cameo Frame die. Adhere to the inside of the walls so cover the plastic seams.
6. Use folded strips of paper to connect the walls. I used my Scotch Tape Glider for adhesive.
7. Cut a piece of chipboard to fit the inside of the house, cover with paper. This will be the floor.
8. Adhere floor using Beacon 3-in-1 adhesive.
9. Cut a plastic berry basket to size and paint with black and silver Dabbers.
10. Cover edges with paper. Carefully bend and shape as shown. Adhere to box with strong adhesive.
11. Cut four fleur de lis from chipboard using Mini Fleur die. Fold in half as shown. Note - since this die isn't symmetrical, you'll have to flip two of them to the opposite side to make sure they line up with their partner. Paint one side with black and silver dabbers.
12. Glue the four piece together, carefully matching the edges. Paint the edges and give it a light wash of Terra Cotta and Snow Cap paint. Wipe off excess. When dry, adhere to top of house with hot glue.
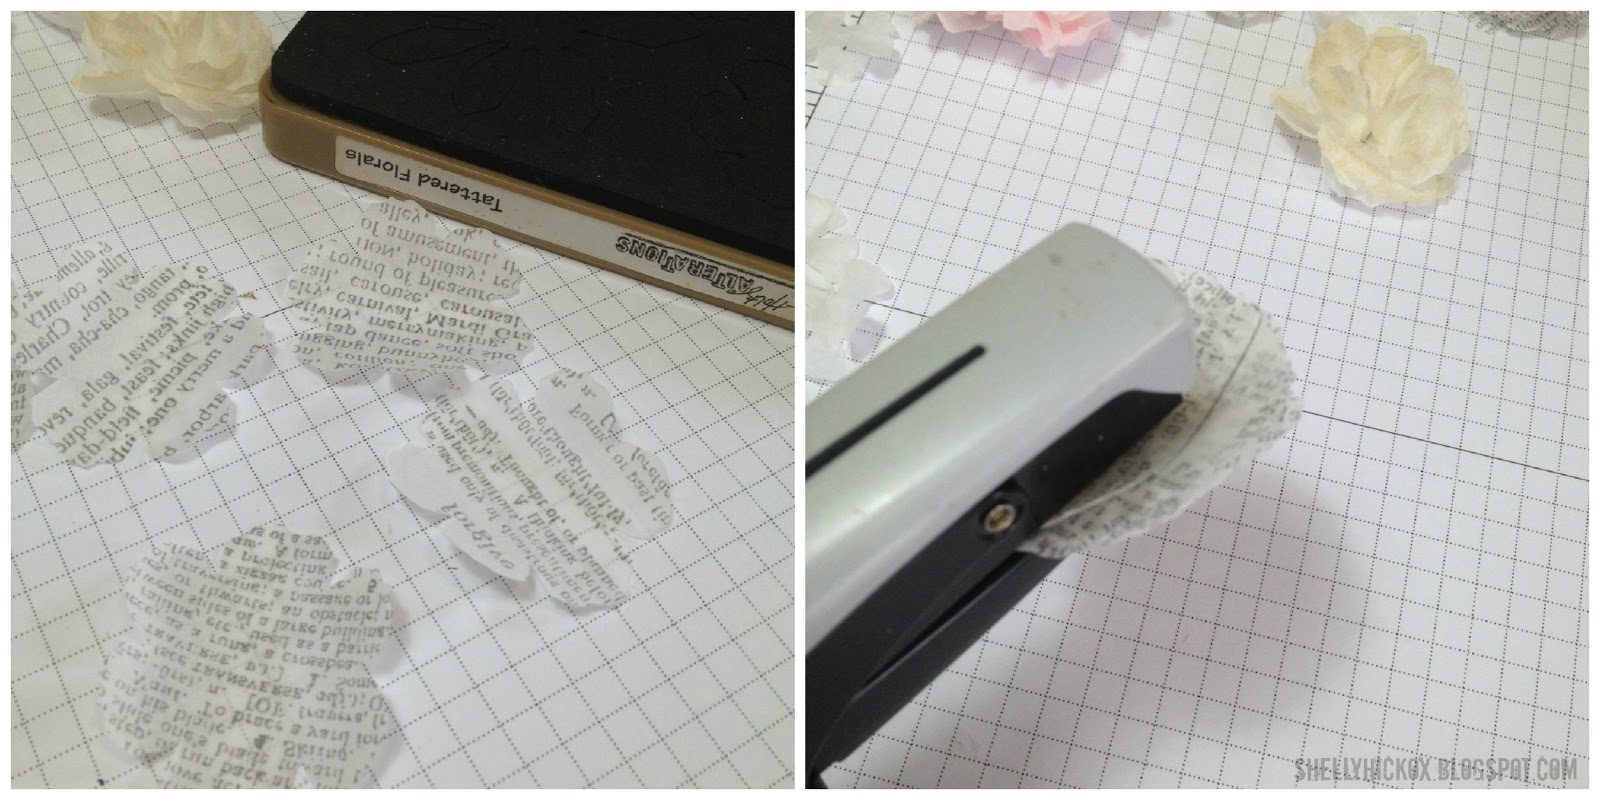
13. Finally, we can cut some flowers! Die cut Terminology Tissue Wrap and white coffee filters using the Tattered Florals die.
14. Stack about 5-6 flowers and staple together with the Tiny Attacher. So easy!
15. Pull the top layer up, scrunching and crumpling it just a bit. Continue with each layer.
16. Fill a Mini Mister about 3/4 with water. Add a few drops of Distress reinker. I wanted a very pastel look, so I used very little. Mist flowers lightly. I love how this looks with a light misting vs. a heavy application of Distress Stain (the way I usually color my flowers). Very pretty!
17. Add sheet moss to the bottom of the house, using hot glue to secure.
18. Ok, for some reason I totally skipped the flower gluing process when I was taking pictures! So sorry about that. The stand for the house was made with an unfinished wood candlestick and a round wood plaque. They were both painted like the house and glued together and to the house with a strong adhesive. I added a piece of grapevine from my yard to adhere the flowers to. I used hot glue to add them, starting at the bottom and continuing up the side. On the bottom, I added a little Tattered Banner that was stamped with a sentiment from Tim's Simple Sayings set. Finally, the bird was glued into place along with a couple more flowers.
I am so in love with how this turned out! I think my next project will be a banner of these flowers - they are just too sweet!
Would you like to win a Tattered Florals die of your own? Tim very generously sent me a die to share with one of you! All you have to do is leave a comment with your name and email by Sunday, March 17th. On Monday morning, I'll randomly choose a name. I also have a few of the Sizzix Talking Tags to share too! The giveaway has ended - thanks so much for entering!
Don't forget to check out
Tim's giveaway - he's going to be choosing 5 winners who will each receive a $100 prize package - WOW!!
If you'd like to purchase the supplies I used, they can be found at Inspiration Emporium via the links below. Remember to use my discount code - stamptramp - to save 10% off your order.

Thanks so much for stopping by - have a great weekend and good luck!