Monday, July 14, 2014

Pop it Ups Designer Challenge - Christmas in July

This month, Karen Burniston challenged the team with a 'Christmas in July' theme. When I got my new dies a couple months ago, all I could think about was making little these 3D trees using the Evergreen Pivot Card dies! I was worried that the dimension would make the trees too bulky to pivot, but they swing back and forth just perfectly!

The deer from Tim Holtz's Styled Woodlands stamp set is going to be one of my all-time faves, I'm sure. When I was picturing this card, I thought it would be just perfect perched on the snow, which was cut with one of the dies from Karen's Outdoor Edges set.

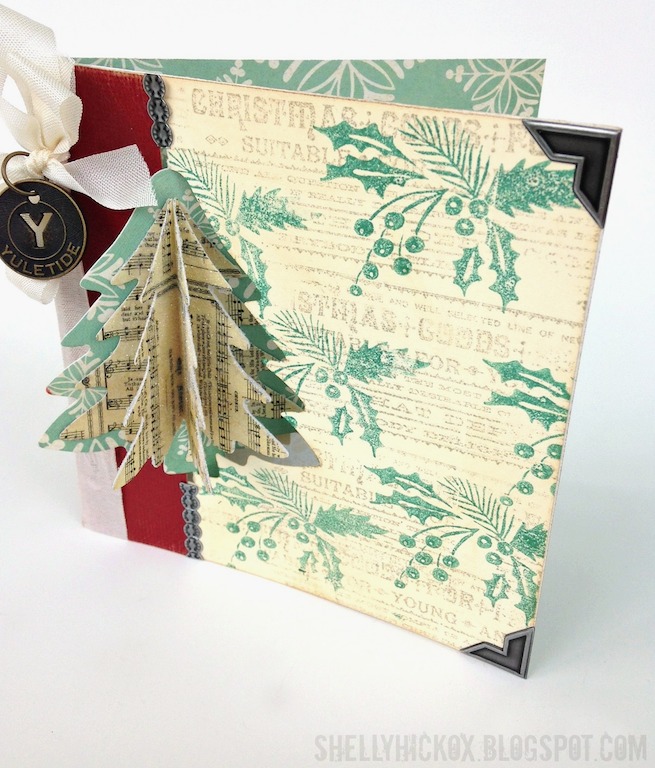
How cute are these trees?! Each tree was cut four times from music-themed paper, scored down the middle and folded in half. I adhered the folded trees to each other, leaving the first and last fold flat. After coating them with glitter, I attached them to the card.

What's really cool about this card is how the big tree looks when the card is closed. Love the dimension! And if you're worried that this will be hard to mail, it won't! The trees all fold flat for mailing and will pop back into place when the card is taken out of the envelope.

The front of the card was stamped with images from Tim Holtz's Styled Woodlands and Christmas Nostalgia stamp sets. I added some ribbon, a Christmas Muse Token, and some idea-ology trim and my card was done!


Here's a quick video so you can see how the Evergreen Pivot works. There are so many different ways you can use this die!

The dies I used can be found at Elizabeth Craft Designs. the rest of the supplies I used can be found at Inspiration Emporium. Remember to use my coupon code - stamptramp - to save 10% off your order (at IE only).


Friday, July 11, 2014

New Stamps From Tim Holtz & Stampers Anonymous!

Hi all! I have a fun card to share with you using one of the new stamp sets that Tim Holtz released today. If you haven't already seen his post, you must check it out! The card samples are absolutely inspiring.

The images on this card are all included in the Mini Halloween 4 set. Of course, I couldn't resist using this mini version of The Chemist - one of my all-time favorite stamps. The background of the card started as a Giant Manila Tag that I first stamped with the script stamp using Picket Fence Distress paint. After it dried, I colored the tag with Tim's wrinkle free distress technique. The Chemist was stamped and colored and adhered to the card with foam dots.

The base of the card is black Kraft Core-dinations that was sanded lightly. I added a torn page from a vintage math book (I also stamped the label on paper from the same book) and layered the inked panel on top.

My favorite part of this whole card is this little row of bottles. I first stamped the bottles image and then colored it in with coordinating marker colors, highlighting it here and there with a Picket Fence Distress marker. I wanted more dimension though, and hit upon the idea of adding some die cut bottles. But, they were way too big! Hmmm...what do you do when a die cut is too big? You shrink it!

I cut the bottles from Ranger's Clear Shrink Plastic and inked the back of one with silver alcohol ink. On the other bottle, I stamped the poison label using StazOn ink. After shrinking them with my heat tool, I applied a Remnant Rub to one and then adhered them to the stamped image. It's hard to see in the pic, but it looks so cool!

Most of the supplies I used can be found at Inspiration Emporium via the links below. Remember to use my coupon code - stamptramp - to save 10%!


Thanks so much for stopping by today! I have lots more cards to share, so stay tuned!

Friday, July 4, 2014

Celebrating the 4th with Pop it Ups!

Happy Independence Day! Today I have a fun patriotic card to share that I made with some of Karen Burniston's new Pop it Ups dies.  I have to admit, the entire card was designed around this fabulous star border - I absolutely love it. Stamps and embellishments from Tim Holtz added the perfect vintage touch!

The card base was cut from white cardstock and inked lightly with Brushed Corduroy Distress ink. To apply the border, I ran blue Kraft Core-dinations cardstock through my Xyron and then die cut it with the Katie Stars Frame Edges dies. I applied the border to my card, then sanded lightly. To add a little sparkle, I used the same die and cut the border from glitter paper. I applied the star cutouts randomly to the negative space on the border.

How cute is this little banner? I used one of the dies from Karen's Lots of Pops die set to cut the individual flags out of burlap paper. They were folded over a length of idea-ology Paper String and glued. I adhered the ejected stars from the border to each little flag. They are too adorable!

For the inner panels, I cut the card panels again, this time out of red Kraft Core-dinations. I removed the center portion and adhered it over the white card. After sanding lightly, I adhered idea-ology trimmings. The images were stamped on white cardstock using Denim Adirondack ink, then cut them with the oval from Karen's Oval Accordion Card die set. (I love mixing and matching her dies - they all go so well together!) Finally, I added a little banner cut from glitter paper using one of the dies from the new Lorna Label pop-up set and added idea-ology Chit Chat stickers.

You can view the entire Summer 2014 Pop it Ups release here. The dies will be available in mid-July, so make sure you ask your favorite retailer to order them! The other supplies I used can be found at Inspiration Emporium via the links below. Remember to use my coupon code - stamptramp - to save 10%!


Thanks so much for stopping by today. Have a safe and fun holiday!

Friday, June 27, 2014

New Pop it Ups Release - Spiral Circle Pull Card

Hi all! Today Karen Burniston shared the second half of her Pop it Ups Summer release. Two of my favorite dies from this collection have to be the Clock and Gears and the Spiral Circle Pull Card. When combined, these dies are absolutely jaw-dropping!

The clock face is one of the coolest dies I've ever seen. The die even cuts the numbers out! To give the clock a vintage look, I stamped the face of it with Tim Holtz's Crackle stamp, and added lots of Brushed Corduroy Distress ink to the edges.

Here is the card in its open position. Amazing, right?! It's hard to see in the pic, but there is an accessory die that cuts a spiral that you attach to the back of the card that unfurls when you open the card. You can attach anything to the spiral, making it look like it's floating or flying. So cool!

The gears were all cut from thin chipboard and given my Faux Tarnished Silver technique. I am totally in love with these gears! They are sized perfectly for cards and tags and I know I will be using them a lot.

I dove deep down into my stash to find the perfect paper for this card. It's from Graphic 45's Steampunk Debutante collection and I'm pretty sure it's probably collectable by now, but I couldn't resist using it! I also remembered I had one of the coordinating stamp sets, so I used the little butterfly stamp to add even more movement to the card.


Static pictures can only show so much. There's nothing like a quick little Vine video to really show off these motion cards. One of my favorite features of the Spiral Circle Pull Card die is the little tabs that keep the card closed. I used the ejection holes from the large gear as faux brads on them. I think it just adds to the industrial look of the card.

All the new dies will be available in mid-July. The other supplies I used can be found at Inspiration Emporium via the links below. Remember to use my coupon code - stamptramp - to save 10% on your order!


Thanks so much for stopping by today - have a wonderfully creative weekend!