I feel a little silly admitting that I didn't sleep very well last night. I just couldn't wait for morning to see what
Tim Holtz had some up with for the first of his 12 Tags of Christmas! As usual, he didn't disappoint. Every time he posts a new tag, it is my favorite - and of course, this one was incredible and I totally fell in love.
Every year, it's been my tradition to show ways of recreating the tag, even if you don't have the materials. I hate when I hear people saying they won't join in because they don't have the stuff. That's crazy! This year it's hard because, for once, I DO have the stuff. I decided that I was still going to try a few
MacGyver antics, just to see if it could be done! Maybe these should be called Tim Gunn 'Make it Work' moments. I love Project Runway and Tim is the best! Anyway.....
The
Kraft Core'dinations cardstock sets the tone for the whole tag. What if you don't have any? I stole an idea from my friend,
Cyndi (thanks, Cyndi!), and created a similar look with kraft cardstock and Adirondack Paint Dabbers. Here are the deets:
1. Cut a tag from kraft cardstock using the
Sizzix Tag and Bookplates die. Cover entire surface with paint using an
Aqua Paint Dabber.
Step 2: Dry with heat gun and apply another layer of paint, this time swiping it in the opposite direction (crosshatch). Dry with heat gun.
Step 3: Emboss using desired folder. I have the
Sizzix Snow Flurries folder Tim used, but I wanted to show that you can change it up and use what YOU have on hand. I actually got so excited at this point that I totally forgot to ink the folder. Oops! the cardstock was so fragile I didn't want to put it back through, so I inked the folder and pressed down. It didn't do the greatest job, so I tried something else.
Step 4: I spritzed it with water! It held the embossing powder just long enough to melt. I actually got kind of freaked out by the coverage and brushed too much off. I can't believe how good it looks after I sanded it!
Ok, we took care of our background, but this is a huge reason why this tag is so awesome: the
Sizzix Tattered Pinecone die. I have it, and it is fantastic! But, what if you ordered it and you don't have it yet? Well...I came up with something that kinda approximates the original. At least if you don't look back at Tim's. ;-) This was inspired by a friend at stamp club who showed us how to make a torn flower.
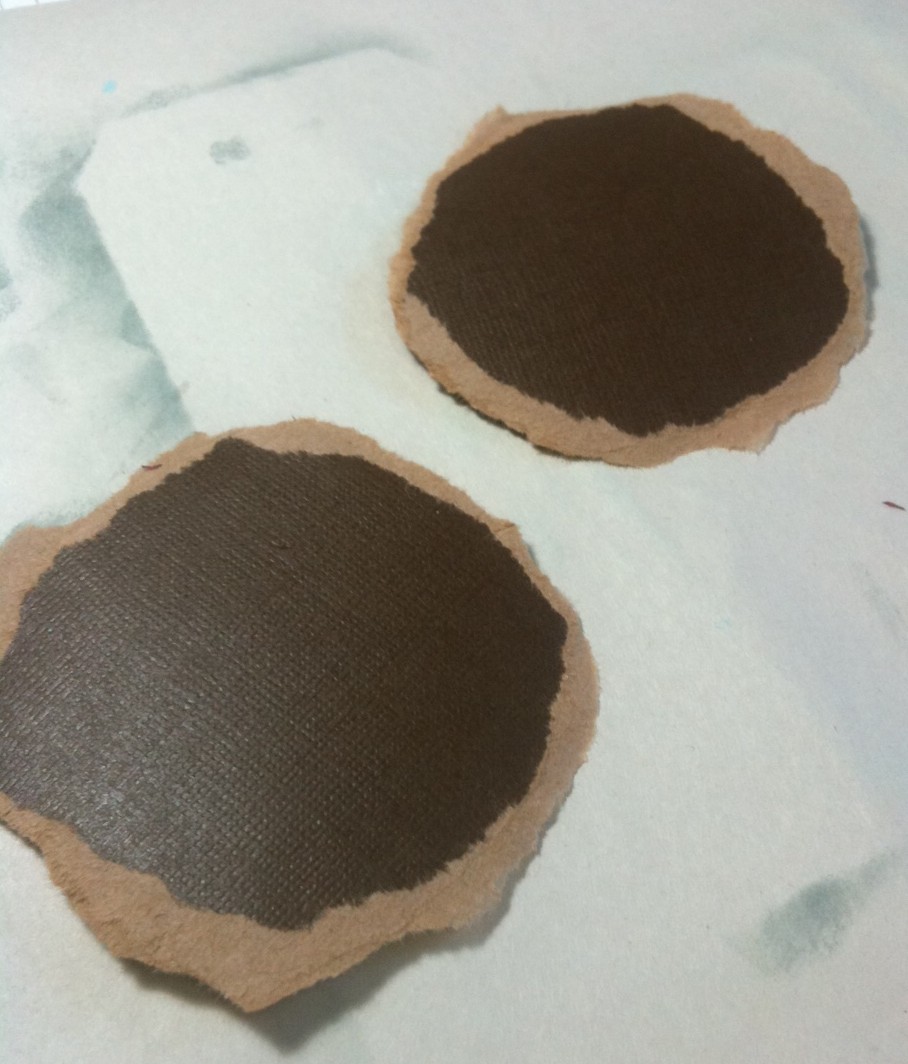
Step 1: Tear a circle shape from Kraft Core'dinations cardstock. I think this is about 3" wide.
Step 2: Tear the cardstock in a spiral shape.
Step 3: Proceed as Tim shows in the video. I know...right now you're doubting me, aren't you? Just wait - they get better.
Step 4: See! A little ink, paint, and glitter and they're not too bad. I think they look somewhat pineconey anyway. :-)
So, background done, pine cones made. Rats! You don't have the
Tattered Banners die! But, you do have some
Idea-ology Tissue Tape, Distress ink, and cardstock. Right? You can make a Tissue Tape Banner!
Step 1: Adhere a strip of Tissue Tape to a piece of tan cardstock. Ink with
Brushed Corduroy Distress ink.
Step 2: Trim excess cardstock, clip ends, and shape into banner. Easy!
Ok, this is just a little silly thing I wanted to do. So you don't have any
Idea-ology Baubles, you say? Well, if you have an oak tree and some pearls....! I painted the acorn cap with my silver Dabber and glued it onto a large pearl. I stuck a straight pin into it to make a little hook. It's attached to my tag with an
Idea-ology Mini Paper Clip. I love it!
So, now you have no excuse not to play along, right? You have all kinds of things at your disposal...you just need to use your imagination and be inspired!! I made a couple more changes to my tag - I used the Reindeer Flight die, just because it's so pretty and I just got it! I also added a little
Idea-ology Philosophy Tag under my pine cones. It's been painted with Snow Cap and Lettuce Dabbers. Oh, I also added a little glittered trim to the bottom that I created with
Tim Holtz's Vintage Lace die.
Speaking of being inspired, the
Inspiration Journal blog has come up with something that you are going to want to check out! For each of the 12 Tag days, we are challenging you to join along. They will be giving away a $20 gift certificate to the store - each day! Plus, if you've entered every day, you are eligible to win a $50 gift certificate! Check it all out
here.
Don't forget, if you want to pick up a few supplies, you can use my coupon code -
stamptramp - to save 10% off your purchases from
Inspiration Emporium. See you all tomorrow!!


So lovely to see your take on Tim's challenge, and I love your improvisation too. Your tag is stunning and I like it cause it's a little different to Tim's. I may make a card rather than a tag using the techniques. Lovely piece. Tracy x
ReplyDeleteYour tag is gorgeous! What a great way to make the pine cones! Love that you gave your own twist to it, even though you have all the supplies to make the original!
ReplyDeleteShelley your tag is stunning! And what a fabulous way to get everyone to join in by showing what you can do. Well done! I will send my friends to your blog when they say the same thing. Look forward to seeing your take on tomorrow. Jennie
ReplyDeletePS I didn't have most of the stuff but improvised!
Just as you look forward to the 12 tags starting, I look forward to YOUR take on them - I so love that your share all your cool ideas!
ReplyDeleteI just love you! So cool!
ReplyDeleteGreat job! I think your tag is as good as Tim's! Love the acorn. Really smart thinking!
ReplyDeleteVal
beautimus - favorite part is the ACORN. Henry collected a whole jar of them and they sprouted worms in a Mason jar...so disgusting...but your acorn is de-lightful and de-lovely!
ReplyDeleteFabulous use of your imagination instead of copying slavishly as too many do! Love your results.
ReplyDeleteJoZarty x
Did I tell you lately that you amaze me. Every project is incredible!
ReplyDeleteHugs and smiles
Love your take on number one. Beautiful tag.
ReplyDeleteMarilyn
Totally awesome way to use what you've got to create a gorgeous Christmas tag!
ReplyDeletebeautiful!!great card!
ReplyDeleteGreat tag! Thanks for sharing your way; I love the acorn and pearl idea;it is beautiful.
ReplyDeleteAbsolutely gorgeous!!!
ReplyDeleteI totally love your tag!!! The deer is fabulous glittered!!! Your pinecones look wonderful!!! Fabulous idea for the background painting craft cardstock!!! And the acorn... wow!!!!!
ReplyDeleteOMG, I love this tag, especially the acorn. No, especially the pinecone. No, the background. I give up, there are too many cool things about this tag. ;-)
ReplyDeleteFantastic post! Just as many great ideas as Tim!! Beautiful tag and I love that you didn't just try to duplicate his, you took the elements and really made it your own. Thanks for the tips on the painted kraft paper (I don't have Coredinations) and also, I think those pine cones look just fab (I don't have Tim's die either). Very inspiring!
ReplyDeleteYour creativity is astounding!
ReplyDeleteFantastic interpretation.
What an inspiration you are! Sensational ways to improvise. Your tag is gorgeous and I too love that you didn't just copy, you found ways to make it your own! I REALLY don't have time for this, but now I want to sit down and play along too. Thanks for the jolt of mojo!
ReplyDeleteHugs,
Linda
Wonderful tag Shelly and I love how you improvised. Your acorn is splendid and I love your pinecones!
ReplyDeleteI'm with PennyB, Shelly! I love YOUR take on the 12 tags of Christmas. Thanks for the inspiration:)
ReplyDelete- DebbieK
Wonderful post. I am guilty of I don't have it excuse. It shows that if you put your mind to it anything is possible. I'll have to pick up the pace to catch up with your creativity.
ReplyDeleteHugs, Chris
I love your improvisations for the supplies that one might not have. Thanks for showing how to make the pinecone!!
ReplyDeleteI so appreciate seeing someone use the concepts and techniques and being so encouraging. My challenge to myself this year is not to do everything Tim does...we'll see how that goes! Thanks again.
ReplyDeleteGorgeous tag, Shelly! I love your attitude and style.
ReplyDeleteIncredibly beautiful details!
ReplyDeleteThank you for the master class))
Shelly - What a terrific tag - it's beautiful. thanks so much for reminding me to use what's here & too incorporate my imagination!
ReplyDeleteLove your take on Tim's tag and so helpful for all those who don't have everything Tim used. Thanks for the inspiration
ReplyDeleteThis is gorgeous and such wonderful ideas on how to improvise, not had time to do mine yet, behind already but I will do it..new to blogging but can't believe how exciting this Tims tag is !!! Hugs trace x
ReplyDeleteBeautiful tag! Tim is one of my favorite designers (maybe my most favorite) and I love his stuff, but being on a very small crafting budget I can't afford to buy a lot of it. In fact pretty much the only things I own with Tim's name on them are Distress Inks. I love seeing ideas for getting the same look (or close) with other items. I do that myself anyway, but it's great to see others' ideas too. I really enjoy your blog. Thanks for sharing your wonderful work! - Judy
ReplyDeletePerty!!! Great take on Tim's tag!
ReplyDeleteHow clever of you to devise a way to reproduce the tag for people who don't have all the exact products! The tag is absolutely beautiful! I actually like it better than the original. Bravo!
ReplyDeletethe pinecones are great! I think some of the substitutions people are making are better than the "real thing".
ReplyDeleteI did the same substitution with the Kraft Core CS except I used the new Aquamarine pearl paint that Martha Stewart is selling at M's. looks WAY better than craft core. the snowflakes are all pearly aqua blue.
Shelly, LOVE and ADORE your tag!!!
ReplyDelete(Better than Tim`s!...shhhhh!)I love Tim's tag too.
Thanks for showing how you can improvise...I am feeling very inspired :)
Shelly this is so awesome, even though you have all of the supplies, you are trying to inspire people who don't. Your tag is beautiful, I love the acorn, it's a lovely idea. Judith xx
ReplyDeletetotally stunning work!!!!
ReplyDeleteBeautiful! You & Tim both put a lot of work into your tag, but I just love your little hints for making do with what you have!!! GORGEOUS!
ReplyDeleteOh..my.. this is gorgeous!!
ReplyDeleteWow!! Love it sooo much ♥♥♥
Hugs Anne
What a wonderful way to adapt tim's tag using what is on hand. I love your tag, so creative.
ReplyDeleteAlison J
**** superbe
ReplyDeletesuperbe
bravo
You are the McGyver of 12 Tags. That pine cone is impressive. Will be trying that out! I have to tell you...you are one of my favs
ReplyDeleteYou are truly the McGyver of crafting, Shelly! I'm glad to know you!
ReplyDeleteShelly love your ideas I never had hardly any of the stuff but I too made it work ! Too much fun too miss out just because you don't have the stuff . Love your pinecones the best ! X
ReplyDeleteShelly, you've gone and done it again...I'm not surprised, but pleasantly thrilled...I just adore what you've done, and giving all these great tips. Love love it..
ReplyDeleteNow if I can just find some of those acorn caps. I must search the local woods around here...lol.
What a beautiful tag!! I love your tips and the acorn!!
ReplyDeleteJen :)
beautiful tag and what a great trick on making the pine cones! Bravo. That's witty!
ReplyDeleteDear Tramp, I've been following your blog for a while because your art is terrific. I luv what you've done here, with the modifications. The faux pinecones? Inspired. I used small real 'cones on my tag, but I'm gonna make some of yours. Thank you!
ReplyDeleteWow, your tag is gorgeous, you did a fantastic improvisation.
ReplyDeleteI really love the MacGyvering antics on your fabulous tags. I have to admit that I used your tags for inspiration as much as I used Tim's. Thanks for all the tip, tricks and techniques you share.
ReplyDeleteThanks so much for your honest instructions and the encouragement to use "what I have." You are absolutely correct - I have "stuff", but get in there and experiment. Your tag is delightful, fun and festive. very nice job!
ReplyDelete